अंतिम अद्यतन:2026-10-12
STL list सोर्स कोड विश्लेषण
0. प्रस्तावना
सोर्स कोड का संगत संस्करण gcc-4.9.1 है
1.list
list एक द्विदिशालय वृत्ताकार लिंक्ड लिस्ट है; इसका स्ट्रक्चर:
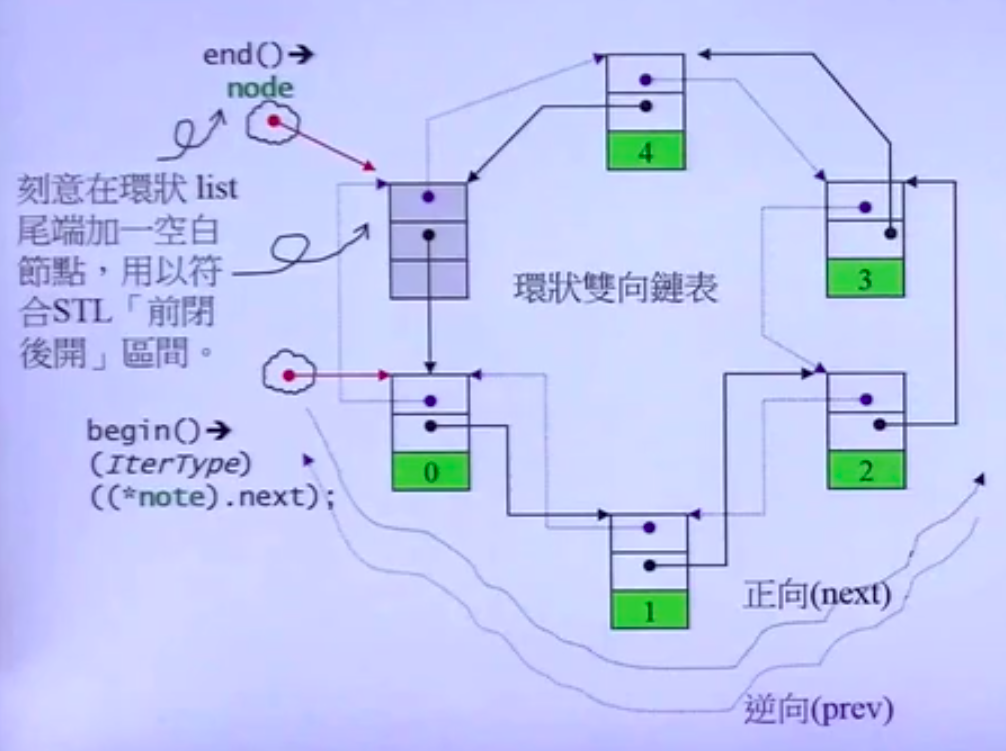
स्वयं बनाया गया चित्र इस प्रकार है:
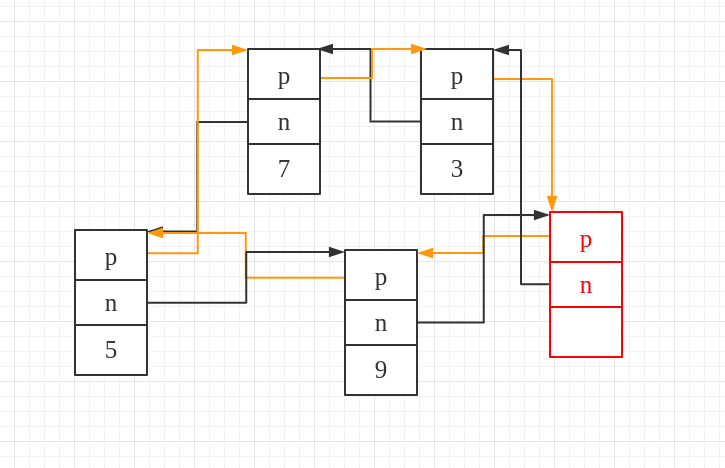
द्विदिशालय वृत्ताकार लिंक्ड लिस्ट में नोड मान 3 से इंसर्शन शुरू होता है; लाल बॉक्स अंतिम नोड (end() जिस नोड की ओर इशारा करता है) को दर्शाता है। पीली रेखा पूर्ववर्ती नोड की ओर इशारा दर्शाती है, काली रेखा उत्तरवर्ती नोड की ओर।
1.1 list का सोर्स कोड
1.1.1 क्लास स्ट्रक्चर
 template<typename _Tp, typename _Alloc = std::allocator<_Tp> >
 class list : protected _List_base<_Tp, _Alloc>
 {

 }
list, _List_base से इनहेरिट करता है।
1.1.2 द्विदिशालय वृत्ताकार लिंक्ड लिस्ट का कार्यान्वयन
कंस्ट्रक्टर
(1) बिना किसी एलिमेंट वाला list
(2) n एलिमेंट्स वाला तथा प्रारंभिक मान दिया गया list
explicit list(size_type __n, const value_type &__value = value_type(),const allocator_type &__a = allocator_type()) : _Base(_Node_alloc_type(__a))
{ _M_fill_initialize(__n, __value); }
(3) एक रेंज से list का आरंभीकरण
template<typename _InputIterator>
list(_InputIterator __first, _InputIterator __last,
     const allocator_type &__a = allocator_type())
        : _Base(_Node_alloc_type(__a)) {
    // Check whether it's an integral type.  If so, it's not an iterator.
    typedef typename std::__is_integer<_InputIterator>::__type _Integral;
    _M_initialize_dispatch(__first, __last, _Integral());
}
नोड का निर्माण
किया गया कार्य: एक नया नोड बनाकर गतिशील रूप से मेमोरी आवंटित करना, और नोड लौटाना।
_Node *_M_create_node(const value_type &__x) {
    _Node *__p = this->_M_get_node();
    __try
    {
        _M_get_Tp_allocator().construct
                (std::__addressof(__p->_M_data), __x);
    }
    __catch(...)
    {
        _M_put_node(__p);
        __throw_exception_again;
    }
    return __p;
}
ध्यान दें कि इसमें दो महत्वपूर्ण फंक्शन्स _M_get_node तथा _M_put_node हैं; देखने पर पता चला कि ये विधियाँ बेस क्लास से आती हैं, जिनका सोर्स कोड है:
_List_node<_Tp> * _M_get_node() { return _M_impl._Node_alloc_type::allocate(1); }

void _M_put_node(_List_node<_Tp> *__p)   _GLIBCXX_NOEXCEPT
{ _M_impl._Node_alloc_type::deallocate(__p, 1); }
इसका तात्पर्य है — नोड बनाते समय मेमोरी गतिशील रूप से आवंटित होती है, और यदि निर्माण के दौरान कोई अपवाद (exception) उठे, तो मेमोरी मुक्त कर दी जाती है।
नोड का इंसर्शन
इंसर्शन में शामिल हैं:
- पूंछ पर n निर्दिष्ट नोड-मान वाले नोड्स इंसर्ट करना — संगत फंक्शन
_M_fill_initialize
list के कंस्ट्रक्टर में उपयोग होता है:
explicit list(size_type __n, const value_type &__value = value_type(),const allocator_type &__a = allocator_type()) : _Base(_Node_alloc_type(__a))
{ _M_fill_initialize(__n, __value); }
- निर्दिष्ट स्थिति पर निर्दिष्ट नोड-मान वाला नोड इंसर्ट करना — संगत फंक्शन
_M_insert
इनमें सर्वाधिक उपयोग किए जाने वाले push_back तथा push_front के अंतर्निहित स्तर पर _M_insert फंक्शन ही कॉल होता है।
दोनों फंक्शन्स का अंतर यह है:
- द्विदिशालय वृत्ताकार लिंक्ड लिस्ट का इंसर्शन फंक्शन
_M_hook(सबसे महत्वपूर्ण!!!)
आगे उल्लिखित push_back, push_front, _M_insert तथा insert — सभी सबसे बुनियादी द्विदिशालय लिंक्ड लिस्ट इंसर्शन फंक्शन _M_hook से ही कार्यान्वित हैं।
अब इसका गहन अध्ययन करते हैं:
इसमें _M_fill_initialize का सोर्स कोड इस प्रकार है:
void _M_fill_initialize(size_type __n, const value_type &__x) {
    for (; __n; --__n)
        push_back(__x);
}
इसमें push_back का सोर्स कोड इस प्रकार है:
इसमें _M_insert, निर्दिष्ट स्थिति पर प्रारंभिक मान x वाला नोड इंसर्ट करता है।
void _M_insert(iterator __position, const value_type &__x) {
    _Node *__tmp = _M_create_node(__x);
    __tmp->_M_hook(__position._M_node);
}
_M_hook का कार्यान्वयन gcc-4.9.1/libstdc++-v3/src/c++98/list.cc में है; बेशक _List_node_base के अन्य फंक्शन्स, जैसे _M_unhook, भी इसी फ़ाइल में हैं।
// 在指定的位置前插入this指向的节点
void_List_node_base::_M_hook(_List_node_base* const __position) _GLIBCXX_USE_NOEXCEPT
{
  this->_M_next = __position;
  this->_M_prev = __position->_M_prev;
  __position->_M_prev->_M_next = this;
  __position->_M_prev = this;
}
अतः उपरोक्त दो फंक्शन्स में बँट गया; ऊपर के कोड का सार इस प्रकार है:
(1) निर्दिष्ट स्थिति पर प्रारंभिक मान x वाला नोड इंसर्ट करना
void _M_insert(iterator __position, const value_type &__x) {
    _Node *__tmp = _M_create_node(__x);
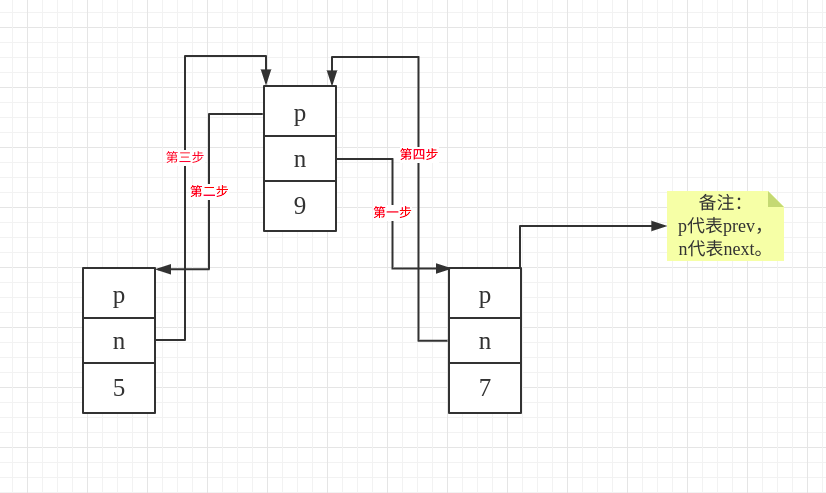
    __tmp->_M_next = __position;            // 第一步
    __tmp->_M_prev = __position->_M_prev;   // 第二步
    __position->_M_prev->_M_next = __tmp;   // 第三步
    __position->_M_prev = __tmp;            // 第四步
}
यह इंसर्शन निर्दिष्ट स्थिति के आगे इंसर्ट करना है (कोड में यही है) — उदाहरण के लिए, निर्दिष्ट __position नोड 7 के आगे नोड-मान 9 वाला नोड (कोड में यही __tmp है) इंसर्ट करना; नीचे इंसर्शन की ठोस प्रक्रिया समझाई गई है।
(2) अंत में क्रमशः n नोड-मान x वाले नोड्स इंसर्ट करना
void _M_fill_initialize(size_type __n, const value_type &__x) {
    for (; __n; --__n)
        _M_insert(end(), __x);
}
उपरोक्त कोड से आप शायद insert का ध्यान आया होगा — इसके तीन रूप हैं। insert की कार्यान्वयन फ़ाइल libstdc++-v3/include/bits/list.tcc है।
- पहला: निर्दिष्ट इटरेटर के आगे निर्दिष्ट एलिमेंट-मान वाला नोड इंसर्ट करना।
कार्यान्वयन आगे वाले _M_hook फंक्शन को कॉल करता है।
template<typename _Tp, typename _Alloc>
typename list<_Tp, _Alloc>::iterator
list<_Tp, _Alloc>::
#if __cplusplus >= 201103L
insert(const_iterator __position, const value_type& __x)
#else
insert(iterator __position, const value_type& __x)
#endif
{
  _Node* __tmp = _M_create_node(__x);
  __tmp->_M_hook(__position._M_const_cast()._M_node);
  return iterator(__tmp);
}
- दूसरा: निर्दिष्ट इटरेटर के आगे n निर्दिष्ट नोड-मान वाले नोड्स इंसर्ट करना।
void insert(iterator __position, size_type __n, const value_type &__x) {
    list __tmp(__n, __x, get_allocator());
    splice(__position, __tmp);
}
कार्यान्वयन में पहले list कंस्ट्रक्टर कॉल होता है, जिससे n निर्दिष्ट नोड-मान वाला list बन जाता है।
explicit list(size_type __n, const value_type &__value = value_type(),const allocator_type &__a = allocator_type()) : _Base(_Node_alloc_type(__a))
{ _M_fill_initialize(__n, __value); }
फिर splice फंक्शन से दूसरे list से वर्तमान list में इंसर्शन पूरा होता है।
void splice(iterator __position, list &__x)
{
    if (!__x.empty()) {
        _M_check_equal_allocators(__x);

        this->_M_transfer(__position._M_const_cast(),
                          __x.begin(), __x.end());
    }
}
इसमें _M_transfer कोड का पीछा करने पर ज्ञात होता है:
// Moves the elements from [first,last) before position.
void
_M_transfer(iterator __position, iterator __first, iterator __last) {
    __position._M_node->_M_transfer(__first._M_node, __last._M_node);
}
पुनः विश्लेषण से पता चलता है कि यह list की बेस क्लास _List_node_base से आता है, और _M_transfer की कार्यान्वयन फ़ाइल gcc-4.9.1/libstdc++-v3/src/c++98/list.cc है:
void _List_node_base::
_M_transfer(_List_node_base * const __first,
    _List_node_base * const __last) _GLIBCXX_USE_NOEXCEPT
{
  if (this != __last)
  {
      // Remove [first, last) from its old position.
      __last->_M_prev->_M_next  = this;
      __first->_M_prev->_M_next = __last;
      this->_M_prev->_M_next    = __first;

      // Splice [first, last) into its new position.
      _List_node_base* const __tmp = this->_M_prev;
      this->_M_prev                = __last->_M_prev;
      __last->_M_prev              = __first->_M_prev;
      __first->_M_prev             = __tmp;
  }
}
यह भी वही उपरोक्त चित्र है:
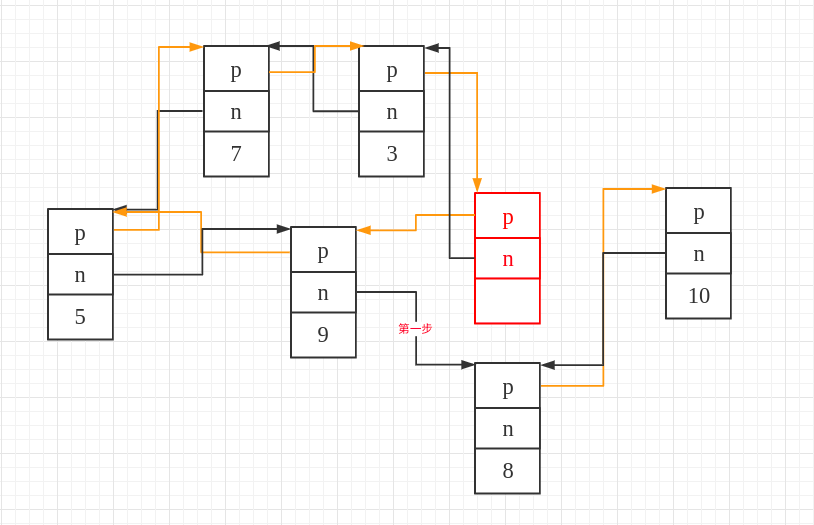
पिछले विश्लेषण से हम जानते हैं कि splice उपरोक्त चित्र द्वारा दर्शाए गए पूरे list को निर्दिष्ट इटरेटर के आगे इंसर्ट करता है; उदाहरण के लिए, हम नीचे के दो नोड्स के आगे इंसर्ट करना चाहते हैं, जिसके ठोस चित्र-चरण इस प्रकार हैं:
this जिस नोड का प्रतिनिधित्व करता है वह मान 8 वाला नोड है; नीचे का चित्र नोड 10 तथा नोड 8 के बीच पूरे list को इंसर्ट करने का वर्णन है।
__last लाल बॉक्स वाले नोड का प्रतिनिधित्व करता है, जो end() जिस नोड की ओर इशारा करता है वही नोड है; हमें उस नोड की आवश्यकता नहीं, इसलिए आगे की प्रक्रिया में उसे पूरे list से हटा दिया जाता है।
__first चित्र में नोड-मान 3 वाले नोड का प्रतिनिधित्व करता है।
पहला चरण: पहले अंतिम वैध नोड — अर्थात् लाल बॉक्स से पहले वाले नोड — का next पॉइंटर निर्दिष्ट नोड 8 की ओर कर दें।
संगत कोड:
दूसरा चरण: _last का next पॉइंटर अपनी ओर कर दें।

संगत कोड:
तीसरा चरण: निर्दिष्ट इटरेटर से पहले वाले नोड का next पॉइंटर मूल list के पहले नोड (__first) की ओर कर दें।
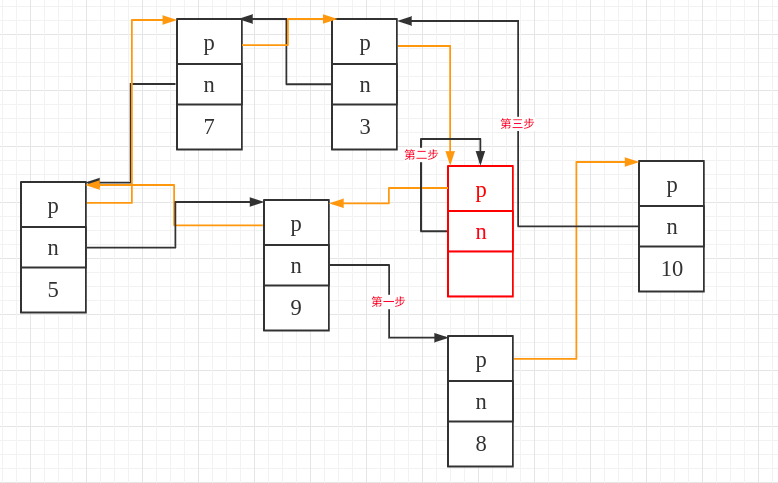
संगत कोड:
चौथा चरण: निर्दिष्ट इटरेटर का पूर्ववर्ती नोड सुरक्षित रखें (चित्र में नोड-मान 10 वाला नोड)।
पाँचवाँ चरण: निर्दिष्ट इटरेटर का पूर्ववर्ती नोड मूल list के वास्तविक अंतिम नोड (end() से एक पहले वाले नोड) की ओर कर दें।
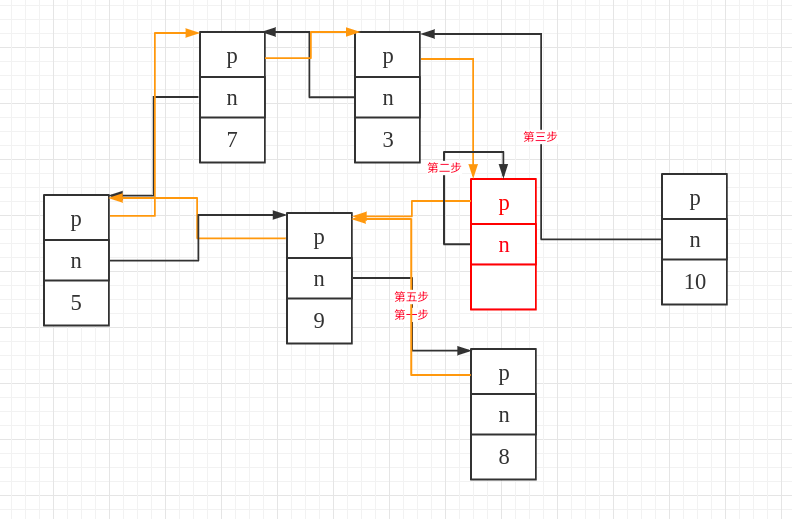
संगत कोड:
छठा चरण: मूल list के अंतिम नोड (end() जिस नोड की ओर इशारा करता है) का prev अपनी ओर कर दें।

संगत कोड:
सातवाँ चरण: मूल list के पहले नोड का prev चौथे चरण में सुरक्षित नोड की ओर कर दें।
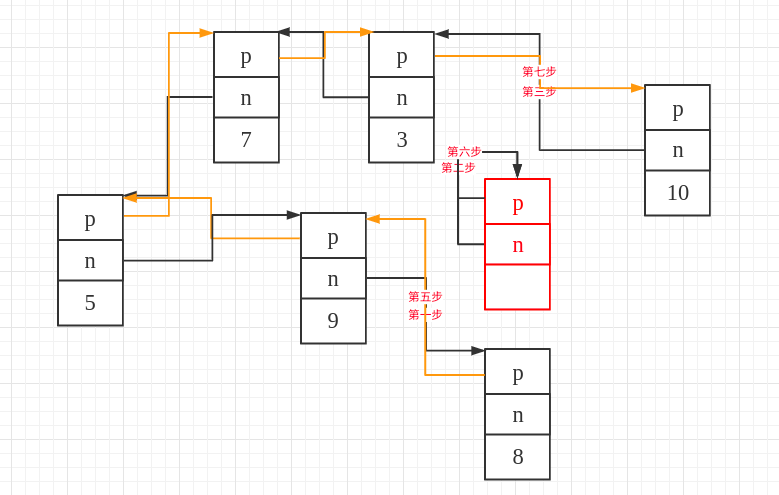
संगत कोड:
इस प्रकार उपरोक्त सात चरणों के ऑपरेशन से, नोड 8 तथा नोड 10 के बीच एक list इंसर्ट हो जाता है।
- तीसरा: एक list की रेंज से डेटा को निर्दिष्ट इटरेटर के आगे इंसर्ट करना।
template<typename _InputIterator>
void
insert(iterator __position, _InputIterator __first,
       _InputIterator __last) {
    list __tmp(__first, __last, get_allocator());
    splice(__position, __tmp);
}
सिद्धांत वही है, बस इस __tmp में दूसरा कंस्ट्रक्टर कॉल होता है।
नोड का विलोपन
- निर्दिष्ट नोड का विलोपन
निर्दिष्ट नोड का विलोपन दो प्रकार का है — पहला इटरेटर से, दूसरा एलिमेंट-मान से।
(1) इटरेटर से विलोपन — संगत फंक्शन erase
इनमें pop_front, pop_back, erase तथा remove का कार्यान्वयन _M_erase फंक्शन पर आधारित है।
this->_M_erase(begin());    // pop_front 不断删除起点的元素
this->_M_erase(iterator(this->_M_impl._M_node._M_prev)); // pop_back移除最后一个元素
libstdc++-v3/include/bits/list.tcc में:
erase(iterator __position)
#endif
{
  iterator __ret = iterator(__position._M_node->_M_next);
  _M_erase(__position._M_const_cast());
  return __ret;
}
(2) एलिमेंट-मान से विलोपन — संगत फंक्शन remove
विशेष स्थिति का निपटान: यदि हटाए जाने वाले एलिमेंट का पता इटरेटर के पते के समान हो, तो पहले उसे सुरक्षित रख लिया जाता है; अंत में जाँचा जाता है कि सुरक्षित इटरेटर end() है या नहीं — यदि नहीं, तो उसे हटा दिया जाता है। अंतर्निहित स्तर पर विलोपन अब भी _M_erase से ही होता है।
template<typename _Tp, typename _Alloc>
void list<_Tp, _Alloc>::remove(const value_type& __value)
{
  iterator __first = begin();
  iterator __last = end();
  iterator __extra = __last;
  while (__first != __last)
  {
      iterator __next = __first;
      ++__next;
      if (*__first == __value)
        {
          // _GLIBCXX_RESOLVE_LIB_DEFECTS
          // 526. Is it undefined if a function in the standard changes
          // in parameters?
          if (std::__addressof(*__first) != std::__addressof(__value))
        _M_erase(__first);
          else
        __extra = __first;
        }
      __first = __next;
  }
  if (__extra != __last)
    _M_erase(__extra);
}
इस remove के अतिरिक्त एक और है — remove_if, जो शर्त (condition) के अनुसार विलोपन करता है।
template<typename _Tp, typename _Alloc>
template <typename _Predicate>
void list<_Tp, _Alloc>::
remove_if(_Predicate __pred)
{
    iterator __first = begin();
    iterator __last = end();
    while (__first != __last)
    {
        iterator __next = __first;
        ++__next;
        if (__pred(*__first))
          _M_erase(__first);
        __first = __next;
    }
}
उपरोक्त remove से if हटाकर, उसके भीतर एक शर्त जोड़ देना ही पर्याप्त है।
उपयोग इस प्रकार:
bool isone(int one) {
    return one==2;
}
int main() {
    list<int> t;
    t={3,4,0,2,0,10,10};
    for(auto i:t) cout<<i<<" ";  // 3 4 0 2 0 10 10
    cout<<endl;
    t.remove_if(isone);
    for(auto i:t) cout<<i<<" ";  // 3 4 0 0 10 10
    cout<<endl;
}
- नोड्स की श्रृंखला का विलोपन
- सभी नोड्स का विलोपन — संगत फंक्शन
clear
(1) निर्दिष्ट नोड के विलोपन का विस्तृत विश्लेषण
_M_erase(iterator __position)
_GLIBCXX_NOEXCEPT
{
    __position._M_node->_M_unhook();
    _Node *__n = static_cast<_Node *>(__position._M_node);
#if __cplusplus >= 201103L
    _M_get_Node_allocator().destroy(__n);
#else
    _M_get_Tp_allocator().destroy(std::__addressof(__n->_M_data));
#endif
    _M_put_node(__n);       // 释放内存
}
इसमें _M_unhook का कार्यान्वयन gcc-4.9.1/libstdc++-v3/src/c++98/list.cc में है, जो इस प्रकार है:
void _List_node_base::_M_unhook() _GLIBCXX_USE_NOEXCEPT
{
  _List_node_base* const __next_node = this->_M_next;   // 第一步:保存后继节点
  _List_node_base* const __prev_node = this->_M_prev;   // 第二步:保存前驱节点
  __prev_node->_M_next = __next_node;                   // 第三步:前驱节点的next指向后继节点
  __next_node->_M_prev = __prev_node;                   // 第四步:后继节点的prev指向前驱节点
}
उदाहरण: नोड-मान 9 वाले नोड का विलोपन — तीसरे तथा चौथे चरण का चित्र-विवरण:
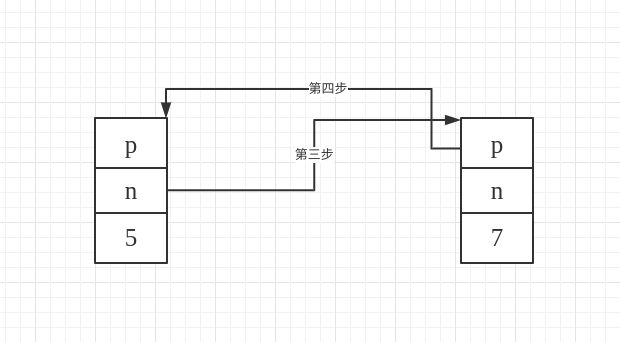
(2) एलिमेंट्स की श्रृंखला के विलोपन का विस्तृत विश्लेषण
iterator
#if __cplusplus >= 201103L
erase(const_iterator __first, const_iterator __last) noexcept
#else
erase(iterator __first, iterator __last)
#endif
{
    while (__first != __last)
        __first = erase(__first);
    return __last._M_const_cast();
}
erase का उपयोग करके, दिए गए इटरेटर रेंज के भीतर का डेटा हटाया जाता है।
(3) सभी एलिमेंट्स के विलोपन का विस्तृत विश्लेषण
एलिमेंट्स खाली कर आरंभीकृत किया जाता है, तथा list अपनी डिफ़ॉल्ट अवस्था में लौट आता है।
इसमें _M_clear का कार्यान्वयन libstdc++-v3/include/bits/list.tcc में है:
_List_base<_Tp, _Alloc>::
_M_clear() _GLIBCXX_NOEXCEPT
{
  typedef _List_node<_Tp>  _Node;
  _Node* __cur = static_cast<_Node*>(_M_impl._M_node._M_next);
  while (__cur != &_M_impl._M_node)
    {
      _Node* __tmp = __cur;         // 保存节点
      __cur = static_cast<_Node*>(__cur->_M_next);  // 往后遍历
    #if __cplusplus >= 201103L
      _M_get_Node_allocator().destroy(__tmp);
    #else
      _M_get_Tp_allocator().destroy(std::__addressof(__tmp->_M_data));
    #endif
      _M_put_node(__tmp);   // 释放内存
    }
}
_M_init का कार्यान्वयन — सब कुछ अपनी ही ओर इशारा करा देना है।
void _M_init()
_GLIBCXX_NOEXCEPT
{
    this->_M_impl._M_node._M_next = &this->_M_impl._M_node;
    this->_M_impl._M_node._M_prev = &this->_M_impl._M_node;
}
एलिमेंट तक पहुँच
प्रत्येक के दो संस्करण कार्यान्वित हैं: reference तथा const reference।
- front पहला एलिमेंट लौटाता है
reference front()
_GLIBCXX_NOEXCEPT
{ return *begin(); }
const_reference
front() const
_GLIBCXX_NOEXCEPT
{ return *begin(); }
- अंतिम एलिमेंट लौटाता है
reference
back()
_GLIBCXX_NOEXCEPT
{
    iterator __tmp = end();
    --__tmp;
    return *__tmp;
}
const_reference
back() const
_GLIBCXX_NOEXCEPT
{
    const_iterator __tmp = end();
    --__tmp;
    return *__tmp;
}
एल्गोरिद्म
- unique
कंटेनर के प्रत्येक लगातार समान एलिमेंट्स के समूह से, पहले एलिमेंट को छोड़कर शेष सभी को हटा देता है।
ध्यान दें — कोई एलिमेंट list कंटेनर से तभी हटाया जाता है जब वह list कंटेनर के ठीक निकटवर्ती एलिमेंट से समान हो। इसीलिए यह सुविधा क्रमबद्ध (sorted) list के लिए विशेष रूप से उपयोगी है।
template<typename _Tp, typename _Alloc>
template <typename _BinaryPredicate>
  void
  list<_Tp, _Alloc>::
  unique(_BinaryPredicate __binary_pred)
  {
    iterator __first = begin();
    iterator __last = end();
    if (__first == __last)
  return;
    iterator __next = __first;
    while (++__next != __last)
  {
    // 满足条件就删除
    if (__binary_pred(*__first, *__next))
       // 删除
      _M_erase(__next);
    else
      __first = __next;
    __next = __first;
  }
  }
उदाहरण इस प्रकार:
// list::unique
#include <iostream>
#include <cmath>
#include <list>

// a binary predicate implemented as a function:
bool same_integral_part (double first, double second)
{ return ( int(first)==int(second) ); }

// a binary predicate implemented as a class:
struct is_near {
  bool operator() (double first, double second)
  { return (fabs(first-second)<5.0); }
};

int main ()
{
  double mydoubles[]={ 12.15,  2.72, 73.0,  12.77,  3.14,
                       12.77, 73.35, 72.25, 15.3,  72.25 };
  std::list<double> mylist (mydoubles,mydoubles+10);

  mylist.sort();             //  2.72,  3.14, 12.15, 12.77, 12.77,
                             // 15.3,  72.25, 72.25, 73.0,  73.35

  mylist.unique();           //  2.72,  3.14, 12.15, 12.77
                             // 15.3,  72.25, 73.0,  73.35

  mylist.unique (same_integral_part);  //  2.72,  3.14, 12.15
                                       // 15.3,  72.25, 73.0

  mylist.unique (is_near());           //  2.72, 12.15, 72.25

  std::cout << "mylist contains:";
  for (std::list<double>::iterator it=mylist.begin(); it!=mylist.end(); ++it)
    std::cout << ' ' << *it;
  std::cout << '\n';

  return 0;
}
उपरोक्त में क्रमबद्ध करने पर सभी दोहराए एलिमेंट्स हट जाते हैं और केवल एक बचता है; जबकि बिना क्रमबद्ध किए केवल दोहराए तथा लगातार एलिमेंट्स ही हटते हैं।
- merge
merge के सोर्स कोड का कार्यान्वयन आगे वाले _M_transfer फंक्शन को अपनाता है। मान लीजिए अभी दो list हैं — list1 तथा list2। list1 के एलिमेंट की तुलना list2 के एलिमेंट से होती है: यदि list1 के एलिमेंट का मान list2 के एलिमेंट के मान से छोटा है, तो list1 के इटरेटर पर ++ होता है, कोई और ऑपरेशन नहीं; परंतु यदि list1 के एलिमेंट का मान list2 के एलिमेंट के मान से बड़ा है, तो हर बार list2 के इस छोटे एलिमेंट के संगत इटरेटर को _M_transfer फंक्शन में डाला जाता है, और इसी फंक्शन के माध्यम से list2 का छोटा एलिमेंट list1 के अभी-अभी तुलना किए इटरेटर के आगे इंसर्ट हो जाता है — इस प्रकार अंत में सभी एलिमेंट्स list1 में इंसर्ट हो जाते हैं।
जब list1 का पार करना पूरा हो चुका हो और list2 का अभी बाकी हो, तो केवल एक बार _M_transfer चलाकर, list2 लिंक्ड लिस्ट को वर्तमान इटरेटर से अंतिम end तक list1 के अंत में इंसर्ट कर देना ही पर्याप्त है।
template<typename _Tp, typename _Alloc>
void
list<_Tp, _Alloc>::
#if __cplusplus >= 201103L
merge(list&& __x)
#else
merge(list& __x)
#endif
{
  // _GLIBCXX_RESOLVE_LIB_DEFECTS
  // 300. list::merge() specification incomplete
  if (this != &__x)
  {
      _M_check_equal_allocators(__x);

      iterator __first1 = begin();
      iterator __last1 = end();
      iterator __first2 = __x.begin();
      iterator __last2 = __x.end();
      while (__first1 != __last1 && __first2 != __last2)
        if (*__first2 < *__first1)
         {
            iterator __next = __first2;
            _M_transfer(__first1, __first2, ++__next);
            __first2 = __next;
         }
        else
          ++__first1;
      if (__first2 != __last2)
        _M_transfer(__last1, __first2, __last2);
   }
}
उपयोग:
int main() {
    list<int> l1 = {2,3,5,7};
    list<int> l2 = {1,10,9,5};
    l1.sort();
    l2.sort();
    l1.merge(l2);
    for(auto i:l1) cout<<i<<" ";    // 1 2 3 5 5 7 9 10
    return 0;
}
- sort
चूँकि STL के अपने सॉर्टिंग एल्गोरिद्म sort द्वारा स्वीकृत इनपुट इटरेटर रैंडम-एक्सेस इटरेटर है, परंतु द्विदिशालय list लिंक्ड लिस्ट कंटेनर की पहुँच का तरीका द्विदिशालय इटरेटर है — इसलिए STL के अपने सॉर्टिंग एल्गोरिद्म sort का उपयोग नहीं किया जा सकता; अपनी पहुँच के अनुरूप सॉर्टिंग एल्गोरिद्म स्वयं परिभाषित करना पड़ता है। सोर्स कोड के विश्लेषण से हम देखते हैं कि इस सॉर्टिंग एल्गोरिद्म का विचार merge sort जैसा है।
sort में splice जिसे कॉल करता है:
void splice(const_iterator __position, list& __x, const_iterator __i) noexcept
{ splice(__position, std::move(__x), __i); }
आगे का विश्लेषण:
void
splice(iterator __position, list &__x, iterator __i)
{
    iterator __j = __i._M_const_cast();
    ++__j;
    if (__position == __i || __position == __j)
        return;

    if (this != &__x)
        _M_check_equal_allocators(__x);

    this->(__position._M_const_cast(),
                      __i._M_const_cast(), __j);
}
अंत में कॉल होने वाला _M_transfer ही है।
sort में एक और फंक्शन swap है, जो दो लिंक्ड लिस्ट की अदला-बदली पूरी करता है; इसका कार्यान्वयन कोड gcc-4.9.1/libstdc++-v3/src/c++98/list.cc में है:
void
_List_node_base::swap(_List_node_base& __x,
          _List_node_base& __y) _GLIBCXX_USE_NOEXCEPT
{
      if ( __x._M_next != &__x )
    {
      if ( __y._M_next != &__y )
        {
          // Both __x and __y are not empty.
          std::swap(__x._M_next,__y._M_next);
          std::swap(__x._M_prev,__y._M_prev);
          __x._M_next->_M_prev = __x._M_prev->_M_next = &__x;
          __y._M_next->_M_prev = __y._M_prev->_M_next = &__y;
        }
      else
        {
              // __x is not empty, __y is empty.
              __y._M_next = __x._M_next;
              __y._M_prev = __x._M_prev;
              __y._M_next->_M_prev = __y._M_prev->_M_next = &__y;
              __x._M_next = __x._M_prev = &__x;
            }
        }
      else if ( __y._M_next != &__y )
        {
          // __x is empty, __y is not empty.
          __x._M_next = __y._M_next;
          __x._M_prev = __y._M_prev;
          __x._M_next->_M_prev = __x._M_prev->_M_next = &__x;
          __y._M_next = __y._M_prev = &__y;
        }
}
ठोस कार्यान्वयन का विचार यह है — जाँचें कि दोनों लिंक्ड लिस्ट खाली हैं या नहीं, फिर next तथा prev पॉइंटर्स संशोधित कर दें।
अब देखते हैं शक्तिशाली sort:
template<typename _Tp, typename _Alloc>
void
list<_Tp, _Alloc>::
sort() {
    // Do nothing if the list has length 0 or 1.
    if (this->_M_impl._M_node._M_next != &this->_M_impl._M_node
        && this->_M_impl._M_node._M_next->_M_next != &this->_M_impl._M_node) {
        list __carry; // 辅助链表,用于从a中提取元素以及临时保存两个链表的合并结果
        list __tmp[64]; // 保存着当前每一个归并层次的结果, i号链表保存的元素个数为2的i次方或者0
        list *__fill = &__tmp[0]; // 表示当前最大归并排序的层次,while循环之后__fill变成log2(list.size())
        list *__counter;

        do {
            __carry.splice(__carry.begin(), *this, begin()); //把当前链表的第一个节点放在carry链表头

            for (__counter = &__tmp[0];
                 __counter != __fill && !__counter->empty();
                 ++__counter) {
                __counter->merge(__carry);  // 两个有序链表合并
                __carry.swap(*__counter); // 类似于交换链表carry和counter[i]内容
            }
            __carry.swap(*__counter); // 类似于交换链表carry和counter[i]内容
            if (__counter == __fill)
                ++__fill;
        } while (!empty());
        // 每两个进行归并,依次网上,直到最后*(__fill-1)保存最后的排序结果。然后交换到当前list中。
        for (__counter = &__tmp[1]; __counter != __fill; ++__counter)
            __counter->merge(*(__counter - 1));
        swap(*(__fill - 1));
    }
}
उपरोक्त कोड देखने में काफी कठिन लगता है; इंटरनेट पर खोजने पर पाया कि G2.9 में:
template <class T, class Alloc>
void list<T, Alloc> :: sort(){
    // 判断链表是否为空或者只有一个元素
    if(node->next == node || link_type(node->next)->next == node){
        return;
    }

    list<T, Alloc> carry;
    list<T, alloc> counter[64];
    int fill = 0;
    while(!empty()){
        carry.splice(carry.begin(), *this, begin());
        int i = 0;
        while(i < fill && !counter[i].empty()){
            counter[i].merge(carry);
            carry.swap(counter[i++]);
        }
        carry.swap(counter[i]);
        if(i == fill){
            ++fill;
        }
    }

    for(int i = 1; i < fill; ++i){
        counter[i].merge(counter[i-1]);
    }
    swap(counter[fill-1]);
}
इसका संगत बाहरी कार्यान्वयन है:
void sortList(list<int> &l) {
    if (l.size() <= 1) {
        return;
    }
    list<int> carry;       // 辅助链表,用于从a中提取元素以及临时保存两个链表的合并结果
    list<int> counter[64]; // 保存着当前每一个归并层次的结果, i号链表保存的元素个数为2的i次方或者0
    int fill = 0;          // 表示当前最大归并排序的层次,while循环之后fill变成log2(a.size())

    while (!l.empty()) {
        carry.splice(carry.begin(), l, l.begin()); // 将链表a中的第一个元素移动至carry开头
        int i = 0;
        // 从小往大不断合并非空归并层次直至遇到空层或者到达当前最大归并层次
        while (i < fill && !counter[i].empty()) {
            counter[i].merge(carry);    // 链表合并,结果链表是有序的,必须保证合并前两个链表是有序的
            carry.swap(counter[i++]);   // 链表元素互换
        }
        carry.swap(counter[i]);
        if (i == fill) {       // i到达当前最大归并层次,说明得增加一层
            ++fill;
        }
    }

    for (int i = 1; i < fill; ++i) {  // 将所有归并层次的结果合并得到最终结果counter[fill - 1]
        counter[i].merge(counter[i - 1]);
    }
    l.swap(counter[fill - 1]);
}
इस भाग के लिए संदर्भ लिया जा सकता है
उसमें प्रक्रिया का विस्तृत चित्र-विवरण दिया गया है।
अब हम G4.9 को उसके संगत बाहरी कार्यान्वयन में बदलते हैं:
void sortList1(list<int> &l) {
    typedef list<int> list;
    if (l.size() <= 1) {
        return;
    }
    list __carry;
    list __tmp[64];
    list *__fill = &__tmp[0];
    list *__counter;
    do {
        __carry.splice(__carry.begin(), l, l.begin());
        for (__counter = &__tmp[0];
             __counter != __fill && !__counter->empty();
             ++__counter) {
            __counter->merge(__carry);
            __carry.swap(*__counter);
        }
        __carry.swap(*__counter);
        if (__counter == __fill) ++__fill;
    } while (!l.empty());

    for (__counter = &__tmp[1]; __counter != __fill; ++__counter)
        __counter->merge(*(__counter - 1));

    l.swap(*(__fill - 1));
}
उपयोग:
int main() {
    list<int> l = {7, 5, 8, 1};
    cout << "===============排序前==============" << endl;
    for (auto i:l) cout << i << " ";
    cout << endl;
    sortList1(l);
    cout << "===============排序后==============" << endl;
    for (auto i:l) cout << i << " ";
    cout << endl;

    return 0;
}
ऑपरेटर ओवरलोड
template<typename _Tp, typename _Alloc>
inline bool
operator==(const list<_Tp, _Alloc> &__x, const list<_Tp, _Alloc> &__y) {
    typedef typename list<_Tp, _Alloc>::const_iterator const_iterator;
    const_iterator __end1 = __x.end();
    const_iterator __end2 = __y.end();

    const_iterator __i1 = __x.begin();
    const_iterator __i2 = __y.begin();
    while (__i1 != __end1 && __i2 != __end2 && *__i1 == *__i2) {
        ++__i1;
        ++__i2;
    }
    return __i1 == __end1 && __i2 == __end2;
}
कार्यान्वयन का विचार यह है — पुनरावृत्ति करते हुए जाँचें कि दोनों इटरेटर अंत तक पहुँचे या नहीं।
शेष बचा अन्य ऑपरेटर ओवरलोड अपेक्षाकृत सरल है, इसलिए उनका विवरण नहीं दिया जाता। इनमें lexicographical_compare का कार्यान्वयन c++-v3/src/c++98/stl_algobase.h में है — यह फंक्शन शब्दकोश-क्रम (lexicographic) में परखता है कि [frist1,last1), [first2,last2) से छोटा है या नहीं। यह फंक्शन opeartor< या comp से तुलना करता है। इसका व्यवहार इस प्रकार है: यदि दो सीक्वेंस की लंबाई भिन्न है और छोटे सीक्वेंस का आरंभिक भाग बड़े सीक्वेंस से पूर्णतः समान है — जैसे example तथा examplee — तो बड़ी लंबाई वाले का शब्दकोश-क्रम छोटे से बड़ा होता है।
template <class InputIterator1, class InputIterator2>
bool lexicographical_compare (InputIterator1 first1, InputIterator1 last1,
InputIterator2 first2, InputIterator2 last2)
{
    while (first1!=last1)
    {
        if (first2==last2 || *first2<*first1) return false;
        else if (*first1<*first2) return true;
        ++first1; ++first2;
    }
    return (first2!=last2);
}
उपयोग:
int main() {
     vector<char> v1{'h','e','l','l','o'};
    vector<char> v2{'h','e','l','l','o','o'};
    vector<char> v3{'h','e','l','m','o'};
    cout<<"v1=";
    for(char i:v1)
        cout<<i<<" ";
    cout<<endl;
    cout<<"v2=";
    for(char i:v2)
        cout<<i<<" ";
    cout<<endl;
    cout<<"v3=";
    for(char i:v3)
        cout<<i<<" ";
    cout<<endl;

    if(lexicographical_compare(v1.begin(),v1.end(),v2.begin(),v2.end()))
        cout<<"v1 is less than v2 "<<endl;
    else
        cout<<"v2 is less than v1 "<<endl;

    if(lexicographical_compare(v1.begin(),v1.end(),v3.begin(),v3.end()))
        cout<<"v1 is less than v3 "<<endl;
    else
        cout<<"v3 is less than v1 "<<endl;
}
अन्य ओवरलोडेड ऑपरेटर इस प्रकार हैं:
template<typename _Tp, typename _Alloc>
inline bool
operator<(const list<_Tp, _Alloc> &__x, const list<_Tp, _Alloc> &__y) {
    return std::lexicographical_compare(__x.begin(), __x.end(),
                                        __y.begin(), __y.end());
}

/// Based on operator==
template<typename _Tp, typename _Alloc>
inline bool
operator!=(const list<_Tp, _Alloc> &__x, const list<_Tp, _Alloc> &__y) { return !(__x == __y); }

/// Based on operator<
template<typename _Tp, typename _Alloc>
inline bool
operator>(const list<_Tp, _Alloc> &__x, const list<_Tp, _Alloc> &__y) { return __y < __x; }

/// Based on operator<
template<typename _Tp, typename _Alloc>
inline bool
operator<=(const list<_Tp, _Alloc> &__x, const list<_Tp, _Alloc> &__y) { return !(__y < __x); }

/// Based on operator<
template<typename _Tp, typename _Alloc>
inline bool
operator>=(const list<_Tp, _Alloc> &__x, const list<_Tp, _Alloc> &__y) { return !(__x < __y); }
1.2 list बेस क्लास का सोर्स कोड
_list_base में एक स्ट्रक्चर है: _List_impl, और _List_impl में एक List_node_base है।
class _List_base
{
protected:
  typedef typename _Alloc::template rebind<_List_node<_Tp> >::other
    _Node_alloc_type;

  typedef typename _Alloc::template rebind<_Tp>::other _Tp_alloc_type;

  struct _List_impl
  : public _Node_alloc_type
  {
    __detail::_List_node_base _M_node;

    _List_impl()
    : _Node_alloc_type(), _M_node()
    { }

    _List_impl(const _Node_alloc_type& __a) _GLIBCXX_NOEXCEPT
    : _Node_alloc_type(__a), _M_node()
    { }

    #if __cplusplus >= 201103L
    _List_impl(_Node_alloc_type&& __a) _GLIBCXX_NOEXCEPT
    : _Node_alloc_type(std::move(__a)), _M_node()
    { }
    #endif
  };

  _List_impl _M_impl;
};
अंत में बनने वाला चित्र यही है:
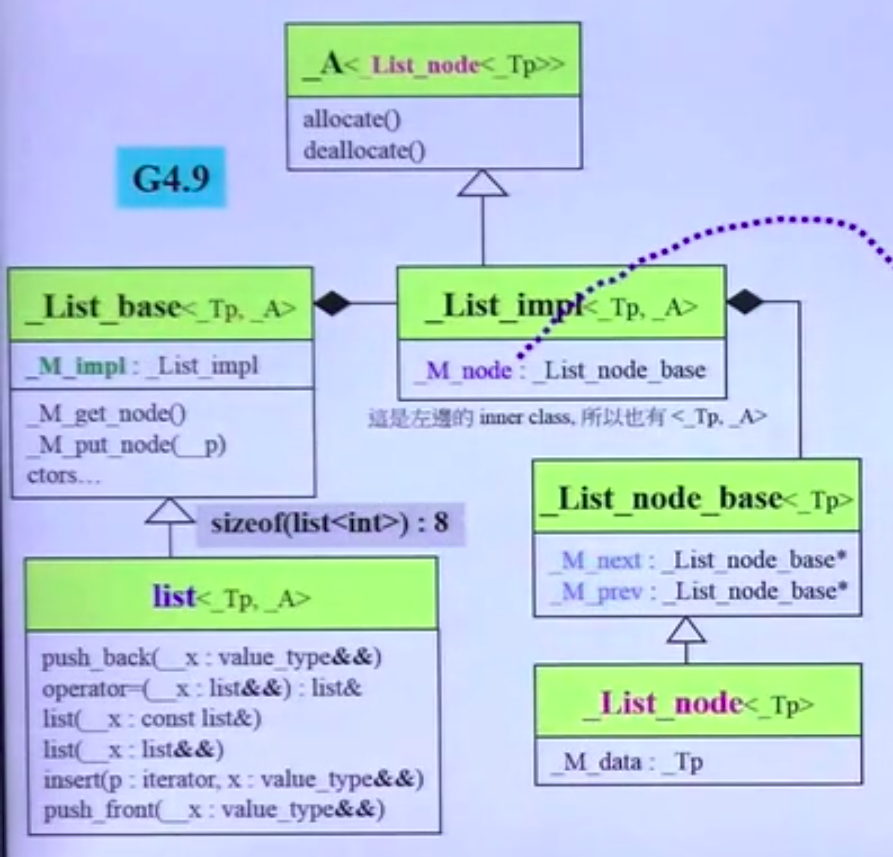
अतः यदि निकाला जाए:
कारण यह है:
list का sizeof 1 है, इसलिए sizeof बेस क्लास _list_base से आता है; _list_base में एक स्ट्रक्चर है: _List_impl, और _List_impl में एक _List_node_base है.
हम जानते हैं _List_node_base में दो पॉइंटर हैं; 64-बिट पर प्रत्येक 8 बाइट का होता है, कुल 16 बाइट।
2.list के Iterator का विश्लेषण
2.1 iterator
list के iterator की परिभाषा
template<typename _Tp>
struct _List_iterator
{
  typedef _List_iterator<_Tp>                _Self;
  typedef _List_node<_Tp>                    _Node;

  typedef ptrdiff_t                          difference_type;
  typedef std::bidirectional_iterator_tag    iterator_category;
  typedef _Tp                                value_type;
  typedef _Tp*                               pointer;
  typedef _Tp&                               reference;

   // The only member points to the %list element.
   __detail::_List_node_base* _M_node;
   //  _List_node(节点的数据部分) -> _List_node_base(前指针与后指针)

  _List_iterator() _GLIBCXX_NOEXCEPT
  : _M_node() { }

  explicit
  _List_iterator(__detail::_List_node_base* __x) _GLIBCXX_NOEXCEPT
  : _M_node(__x) { }

  _Self
  _M_const_cast() const _GLIBCXX_NOEXCEPT
  { return *this; }

  // The only member points to the %list element.
  __detail::_List_node_base* _M_node;
};
आंतरिक ओवरलोडेड फंक्शन्स:
// Must downcast from _List_node_base to _List_node to get to _M_data.
// 重载*操作符
reference operator*() const _GLIBCXX_NOEXCEPT
{
    return static_cast<_Node*>(_M_node)->_M_data;
}

// 重载->操作符
pointer operator->() const _GLIBCXX_NOEXCEPT
{
    return std::__addressof(static_cast<_Node*>(_M_node)->_M_data);
}

// 重载前置++操作符  ++i
_Self& operator++() _GLIBCXX_NOEXCEPT
{
    _M_node = _M_node->_M_next;
    return *this;
}

// 重载后置++操作符 i++
_Self operator++(int) _GLIBCXX_NOEXCEPT
{
    _Self __tmp = *this;             // 记录原值  *调用的是拷贝构造函数
    _M_node = _M_node->_M_next;      // 进行操作
    return __tmp;                    // 返回原值
}

// 重载前置--操作符  --i
_Self& operator--() _GLIBCXX_NOEXCEPT
{
    _M_node = _M_node->_M_prev;
    return *this;
}
// 重载后置--操作符  --i
_Self operator--(int) _GLIBCXX_NOEXCEPT
{
    _Self __tmp = *this;
    _M_node = _M_node->_M_prev;
    return __tmp;
}
// 重载++操作符
bool operator==(const _Self& __x) const _GLIBCXX_NOEXCEPT
{
    return _M_node == __x._M_node;
}
// 重载!=操作符
bool operator!=(const _Self& __x) const _GLIBCXX_NOEXCEPT
{
    return _M_node != __x._M_node;
}
2.2 नोड का डिज़ाइन
iterator के भीतर का _List_node — यहाँ से पता चलता है कि यह _List_node_base से इनहेरिट करता है।
_List_node में डेटा भाग रहता है
_List_node_base में आगे-पीछे (next/prev) पॉइंटर रहते हैं
/// An actual node in the %list.
template<typename _Tp>
struct _List_node : public __detail::_List_node_base
{
  ///< User's data.
  _Tp _M_data;

#if __cplusplus >= 201103L
  template<typename... _Args>
    _List_node(_Args&&... __args)
: __detail::_List_node_base(), _M_data(std::forward<_Args>(__args)...)
    { }
#endif
};
_List_node_base का कोड:
namespace __detail
{
    _GLIBCXX_BEGIN_NAMESPACE_VERSION
    /// Common part of a node in the %list.
    struct _List_node_base
    {
      _List_node_base* _M_next;
      _List_node_base* _M_prev;

      static void
      swap(_List_node_base& __x, _List_node_base& __y) _GLIBCXX_USE_NOEXCEPT;

      void
      _M_transfer(_List_node_base* const __first,
          _List_node_base* const __last) _GLIBCXX_USE_NOEXCEPT;

      void
      _M_reverse() _GLIBCXX_USE_NOEXCEPT;

      void
      _M_hook(_List_node_base* const __position) _GLIBCXX_USE_NOEXCEPT;

      void
      _M_unhook() _GLIBCXX_USE_NOEXCEPT;
    };

    _GLIBCXX_END_NAMESPACE_VERSION
} // namespace detail
इटरेटर के डिज़ाइन में सदैव आगे-बंद-पीछे-खुला ([begin, end)) सिद्धांत बनाए रखा जाता है — उदाहरण के लिए iter->begin() पहले एलिमेंट की ओर इशारा करता है, और iter->end() वास्तविक अंतिम एलिमेंट के अगले एलिमेंट की ओर; इसीलिए अंतिम डिज़ाइन में जानबूझकर वृत्ताकार list की पूंछ पर एक खाली नोड जोड़ा गया, ताकि STL के [begin, end) सिद्धांत के अनुरूप रहे।
संबंधित विषय
- STL array सोर्स कोड विश्लेषण | C++那些事
- STL string गहन विश्लेषण | C++那些事
- STL string इंटरव्यू प्रश्न विस्तृत व्याख्या | C++那些事
- STL deque सोर्स कोड विश्लेषण | C++那些事
- STL खाली बेस क्लास ऑप्टिमाइज़ेशन EBO | C++那些事
- STL स्वहस्त लिखी हैश तालिका कार्यान्वयन | C++那些事
- STL hashtable हैश तालिका | C++那些事
- STL इटरेटर सोर्स कोड विश्लेषण | C++那些事
- STL map तथा multimap | C++那些事
- STL queue तथा stack सोर्स कोड विश्लेषण | C++那些事