最終更新:2026-10-12
STL list ソースコード解析
0. はじめに
ソースコードに対応するバージョンは**gcc-4.9.1**です
1.list
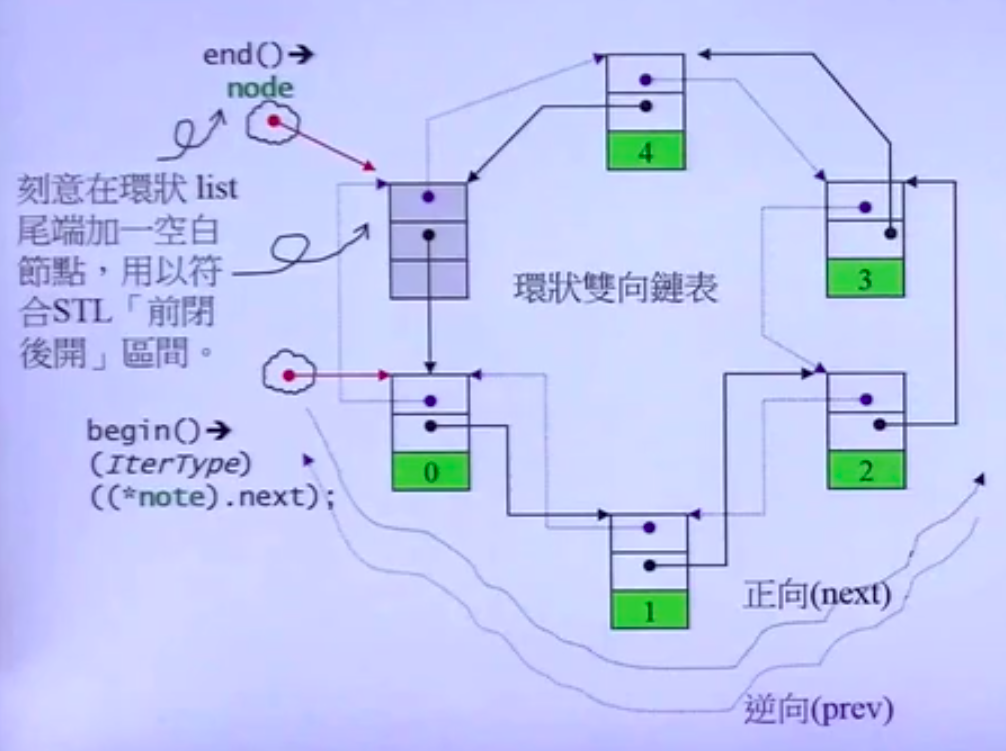
listは双方向循環連結リストで、その構造は次の通りです:
自分で描いた図は次の通りです:
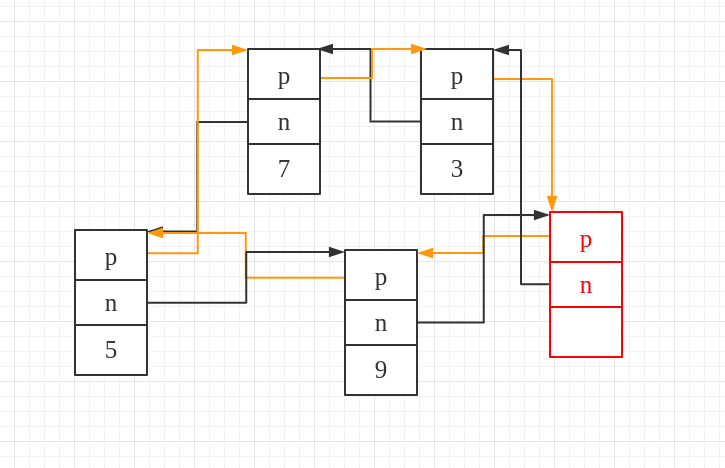
双方向循環連結リストはノード値3から挿入が始まり、赤い枠は最後のノード(end()が指すノード)を表します。黄色い線は前のノードを指すことを、黒い線は次のノードを指すことを表します。
1.1 listソースコード
1.1.1 クラス構造
 template<typename _Tp, typename _Alloc = std::allocator<_Tp> >
 class list : protected _List_base<_Tp, _Alloc>
 {

 }
listは_List_baseを継承します。
1.1.2 双方向循環連結リストの実装
【コンストラクタ】
(1)いかなる要素も持たないlist
(2)n個の要素を持ち初期値を与えるlist
explicit list(size_type __n, const value_type &__value = value_type(),const allocator_type &__a = allocator_type()) : _Base(_Node_alloc_type(__a))
{ _M_fill_initialize(__n, __value); }
(3)ある範囲からlistを初期化
template<typename _InputIterator>
list(_InputIterator __first, _InputIterator __last,
     const allocator_type &__a = allocator_type())
        : _Base(_Node_alloc_type(__a)) {
    // Check whether it's an integral type.  If so, it's not an iterator.
    typedef typename std::__is_integer<_InputIterator>::__type _Integral;
    _M_initialize_dispatch(__first, __last, _Integral());
}
【ノードの作成】
行うこと:新しいノードを作成しメモリを動的に割り当て、ノードを返します。
_Node *_M_create_node(const value_type &__x) {
    _Node *__p = this->_M_get_node();
    __try
    {
        _M_get_Tp_allocator().construct
                (std::__addressof(__p->_M_data), __x);
    }
    __catch(...)
    {
        _M_put_node(__p);
        __throw_exception_again;
    }
    return __p;
}
中に2つの重要な関数_M_get_nodeと_M_put_nodeがあることに注目してください。確認してみると、これらのメソッドは基底クラス由来で、ソースコードは次の通りです:
_List_node<_Tp> * _M_get_node() { return _M_impl._Node_alloc_type::allocate(1); }

void _M_put_node(_List_node<_Tp> *__p)   _GLIBCXX_NOEXCEPT
{ _M_impl._Node_alloc_type::deallocate(__p, 1); }
対応するのは、ノードの作成とメモリの動的割り当てです。作成の過程で例外が投げられた場合は、メモリを解放します。
【ノードの挿入】
ノードの挿入には次のものがあります:
- 末尾にn個の指定したノード値のノードを挿入。対応する関数は
_M_fill_initialize
listのコンストラクタの中で使われています:
explicit list(size_type __n, const value_type &__value = value_type(),const allocator_type &__a = allocator_type()) : _Base(_Node_alloc_type(__a))
{ _M_fill_initialize(__n, __value); }
- 指定した位置に指定したノード値のノードを挿入。対応する関数は
_M_insert
皆さんがよく使うpush_backとpush_frontの基盤は、まさに_M_insert関数の呼び出しです。
両者の関数の違いは次の通りです:
- 双方向循環連結リスト挿入関数
_M_hook(最も重要!!!)
前に触れたpush_back、push_front、_M_insert、そしてinsertは、いずれも最も基礎的な双方向連結リスト挿入関数_M_hookを使って実現されています。
以下で深く研究してみましょう:
_M_fill_initializeのソースコードは次の通りです:
void _M_fill_initialize(size_type __n, const value_type &__x) {
    for (; __n; --__n)
        push_back(__x);
}
push_backのソースコードは次の通りです:
_M_insertは、指定した位置に初期値xのノードを挿入します。
void _M_insert(iterator __position, const value_type &__x) {
    _Node *__tmp = _M_create_node(__x);
    __tmp->_M_hook(__position._M_node);
}
_M_hookの実装はgcc-4.9.1/libstdc++-v3/src/c++98/list.ccの中にあります。もちろん_List_node_baseの他の関数、例えば_M_unhookもこのファイルの中にあります。
// 在指定的位置前插入this指向的节点
void_List_node_base::_M_hook(_List_node_base* const __position) _GLIBCXX_USE_NOEXCEPT
{
  this->_M_next = __position;
  this->_M_prev = __position->_M_prev;
  __position->_M_prev->_M_next = this;
  __position->_M_prev = this;
}
したがって上述は2つの関数に細分化されます。上のコードをまとめると:
(1)指定した位置に初期値xのノードを挿入
void _M_insert(iterator __position, const value_type &__x) {
    _Node *__tmp = _M_create_node(__x);
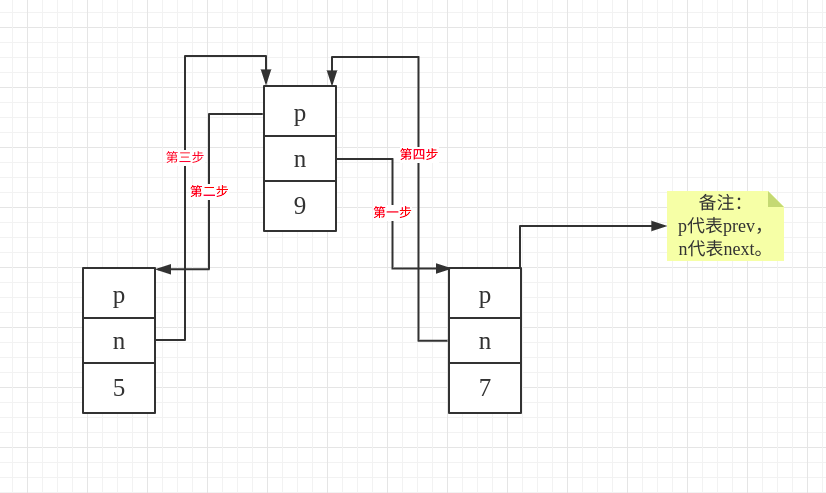
    __tmp->_M_next = __position;            // 第一步
    __tmp->_M_prev = __position->_M_prev;   // 第二步
    __position->_M_prev->_M_next = __tmp;   // 第三步
    __position->_M_prev = __tmp;            // 第四步
}
この挿入は指定した位置の前に挿入するものです。(コードで言えば)例えば、指定した__positionノードが7の前に、ノード値9のノード(コード上の__tmp)を挿入する実装に対応します。以下に具体的な挿入の流れを述べます。
(2)末尾にn個のノード値xのノードを順に挿入
void _M_fill_initialize(size_type __n, const value_type &__x) {
    for (; __n; --__n)
        _M_insert(end(), __x);
}
上のコードから、皆さんはinsertを連想するでしょう。insertには3つあります。insertの実装ファイルはlibstdc++-v3/include/bits/list.tccです。
- 第一:指定したイテレータの前に指定した要素値のノードを挿入。
実装は前の_M_hook関数の呼び出しです。
template<typename _Tp, typename _Alloc>
typename list<_Tp, _Alloc>::iterator
list<_Tp, _Alloc>::
#if __cplusplus >= 201103L
insert(const_iterator __position, const value_type& __x)
#else
insert(iterator __position, const value_type& __x)
#endif
{
  _Node* __tmp = _M_create_node(__x);
  __tmp->_M_hook(__position._M_const_cast()._M_node);
  return iterator(__tmp);
}
- 第二:指定したイテレータの前にn個の指定したノード値のノードを挿入。
void insert(iterator __position, size_type __n, const value_type &__x) {
    list __tmp(__n, __x, get_allocator());
    splice(__position, __tmp);
}
実装は、まずlistのコンストラクタを呼び出し、n個の指定したノード値を持つlistの作成を完了させます。
explicit list(size_type __n, const value_type &__value = value_type(),const allocator_type &__a = allocator_type()) : _Base(_Node_alloc_type(__a))
{ _M_fill_initialize(__n, __value); }
そしてsplice関数を使って、別のlistから現在のlistへの挿入を完了させます。
void splice(iterator __position, list &__x)
{
    if (!__x.empty()) {
        _M_check_equal_allocators(__x);

        this->_M_transfer(__position._M_const_cast(),
                          __x.begin(), __x.end());
    }
}
その中の_M_transferのコードを追跡すると、次のことがわかります:
// Moves the elements from [first,last) before position.
void
_M_transfer(iterator __position, iterator __first, iterator __last) {
    __position._M_node->_M_transfer(__first._M_node, __last._M_node);
}
さらに分析すると、それがlistの基底クラス_List_node_base由来であり、_M_transferの実装ファイルはgcc-4.9.1/libstdc++-v3/src/c++98/list.ccの中にあることがわかります:
void _List_node_base::
_M_transfer(_List_node_base * const __first,
    _List_node_base * const __last) _GLIBCXX_USE_NOEXCEPT
{
  if (this != __last)
  {
      // Remove [first, last) from its old position.
      __last->_M_prev->_M_next  = this;
      __first->_M_prev->_M_next = __last;
      this->_M_prev->_M_next    = __first;

      // Splice [first, last) into its new position.
      _List_node_base* const __tmp = this->_M_prev;
      this->_M_prev                = __last->_M_prev;
      __last->_M_prev              = __first->_M_prev;
      __first->_M_prev             = __tmp;
  }
}
引き続き上の図です:
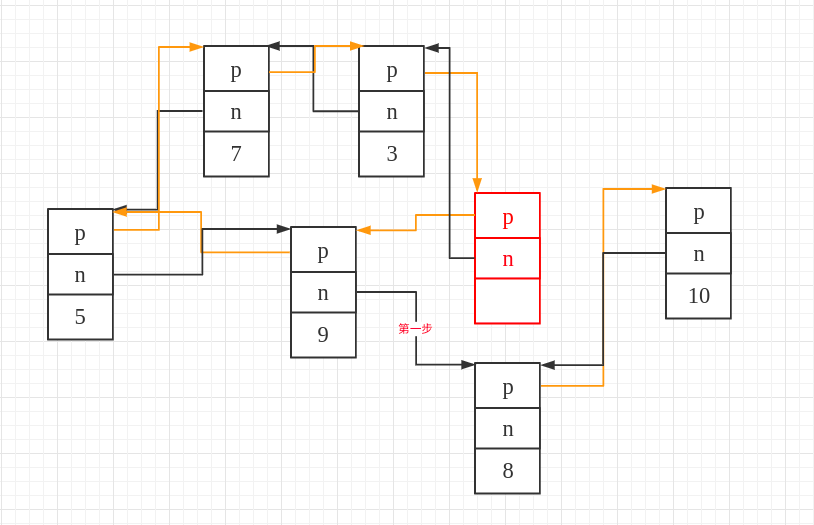
前の分析を経て、spliceは上の図が表すlist全体を指定したイテレータの前に挿入するものであることがわかっています。例えば、以下の2つのノードの前に挿入したい場合、具体的な図のステップは次の通りです:
thisが表すノードは値8のノードで、下の図が表しているのは、ノード10とノード8の間にlist全体を挿入する様子です。
__lastが表すのは赤い枠のノードで、このノードはend()が指すノードです。私たちにはこのノードは不要なので、後の処理で、このノードをlist全体から取り除きます。
__firstが表すのは、図中のノード値3のノードです。
ステップ1:まず最後の有効ノード、すなわち赤い枠の前のノードのnextポインタを、指定したノード8に向けます。
対応するコードは:
ステップ2:_lastのnextポインタを自分自身に向けます。

対応するコードは:
ステップ3:指定したイテレータの前のノードのnexを、元のlistの最初のノード(__first)に向けます。
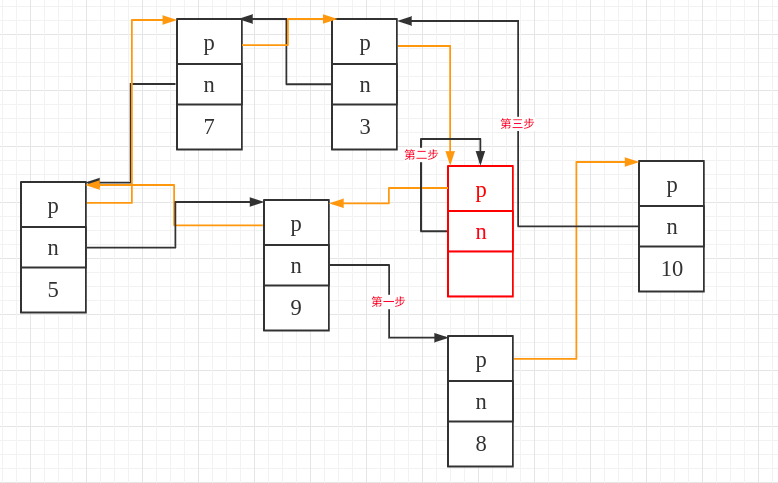
対応するコードは:
ステップ4:指定したイテレータの前のノードを保存します(図中のノード値10のノードに対応)。
ステップ5:指定したイテレータの前のノードを、元のlistの中の実際の最後のノード(end()の前のノード)に向けます。
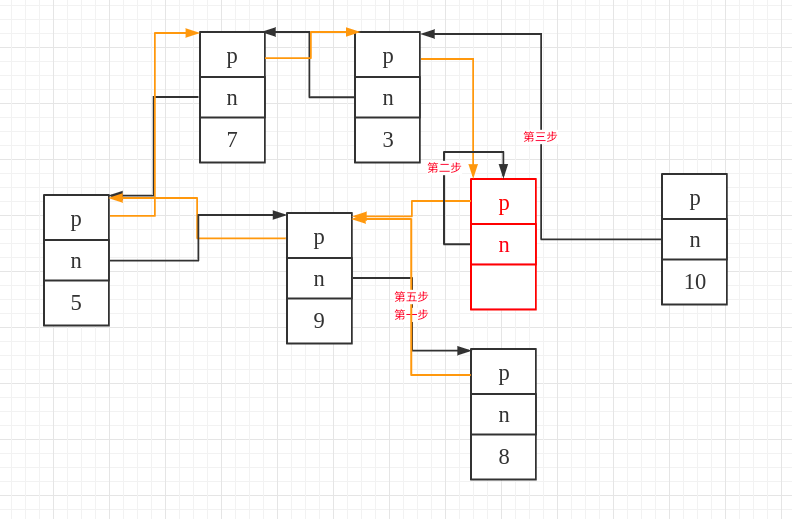
対応するコードは:
ステップ6:元のlistの最後のノード(end()が指すノード)のprevを自分自身に向けます。

対応するコードは:
ステップ7:元のlistの最初のノードのprevを、ステップ4で保存したノードに向けます。
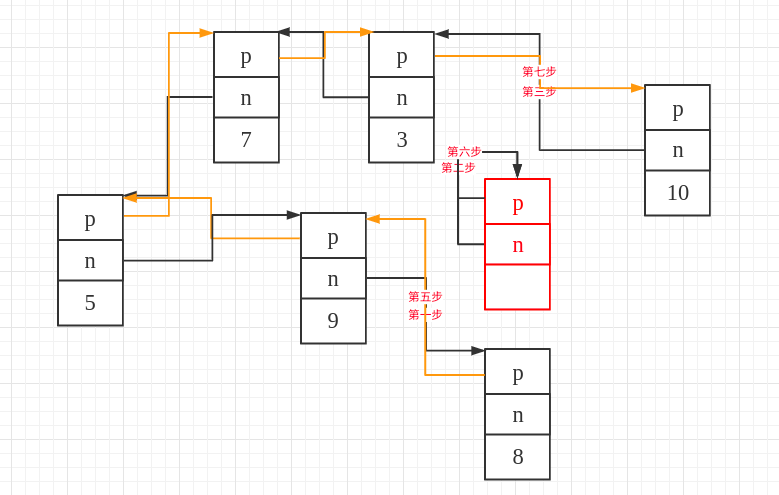
対応するコードは:
このように、以上の7ステップの操作を経て、ノード8とノード10の前にlistを1つ挿入することが完了しました。
- 第三:あるlistの範囲からデータを指定したイテレータの前に挿入。
template<typename _InputIterator>
void
insert(iterator __position, _InputIterator __first,
       _InputIterator __last) {
    list __tmp(__first, __last, get_allocator());
    splice(__position, __tmp);
}
原理は上と同じで、ただこの__tmpは別のコンストラクタを呼び出しています。
【ノードの削除】
- 指定したノードの削除
指定したノードの削除は2つに分かれます。第一はイテレータによる削除、第二は要素値による削除です。
(1)イテレータによる削除。対応する関数はerase
pop_frontとpop_back、erase、removeの基盤の実装は_M_erase関数に基づいています。
this->_M_erase(begin());    // pop_front 不断删除起点的元素
this->_M_erase(iterator(this->_M_impl._M_node._M_prev)); // pop_back移除最后一个元素
libstdc++-v3/include/bits/list.tccの中では:
erase(iterator __position)
#endif
{
  iterator __ret = iterator(__position._M_node->_M_next);
  _M_erase(__position._M_const_cast());
  return __ret;
}
(2)要素値による削除。対応する関数はremove
特殊なケースの処理として、削除する要素のアドレスとイテレータのアドレスが同じときは、まず保存しておき、最後に保存したイテレータがend()かどうかを判断し、そうでなければ削除します。基盤は引き続き_M_eraseによる削除です。
template<typename _Tp, typename _Alloc>
void list<_Tp, _Alloc>::remove(const value_type& __value)
{
  iterator __first = begin();
  iterator __last = end();
  iterator __extra = __last;
  while (__first != __last)
  {
      iterator __next = __first;
      ++__next;
      if (*__first == __value)
        {
          // _GLIBCXX_RESOLVE_LIB_DEFECTS
          // 526. Is it undefined if a function in the standard changes
          // in parameters?
          if (std::__addressof(*__first) != std::__addressof(__value))
        _M_erase(__first);
          else
        __extra = __first;
        }
      __first = __next;
  }
  if (__extra != __last)
    _M_erase(__extra);
}
このremoveのほかに、条件に応じて削除するremove_ifもあります。
template<typename _Tp, typename _Alloc>
template <typename _Predicate>
void list<_Tp, _Alloc>::
remove_if(_Predicate __pred)
{
    iterator __first = begin();
    iterator __last = end();
    while (__first != __last)
    {
        iterator __next = __first;
        ++__next;
        if (__pred(*__first))
          _M_erase(__first);
        __first = __next;
    }
}
上のremoveのifを取り除き、中に判断を1つ追加するだけです。
使用方法は次の通りです:
bool isone(int one) {
    return one==2;
}
int main() {
    list<int> t;
    t={3,4,0,2,0,10,10};
    for(auto i:t) cout<<i<<" ";  // 3 4 0 2 0 10 10
    cout<<endl;
    t.remove_if(isone);
    for(auto i:t) cout<<i<<" ";  // 3 4 0 0 10 10
    cout<<endl;
}
- 一連のノードの削除
- すべてのノードの削除。対応する関数は
clear
(1)指定したノードの削除の詳細分析
_M_erase(iterator __position)
_GLIBCXX_NOEXCEPT
{
    __position._M_node->_M_unhook();
    _Node *__n = static_cast<_Node *>(__position._M_node);
#if __cplusplus >= 201103L
    _M_get_Node_allocator().destroy(__n);
#else
    _M_get_Tp_allocator().destroy(std::__addressof(__n->_M_data));
#endif
    _M_put_node(__n);       // 释放内存
}
_M_unhookの実装はgcc-4.9.1/libstdc++-v3/src/c++98/list.ccにあり、実装は次の通りです:
void _List_node_base::_M_unhook() _GLIBCXX_USE_NOEXCEPT
{
  _List_node_base* const __next_node = this->_M_next;   // 第一步:保存后继节点
  _List_node_base* const __prev_node = this->_M_prev;   // 第二步:保存前驱节点
  __prev_node->_M_next = __next_node;                   // 第三步:前驱节点的next指向后继节点
  __next_node->_M_prev = __prev_node;                   // 第四步:后继节点的prev指向前驱节点
}
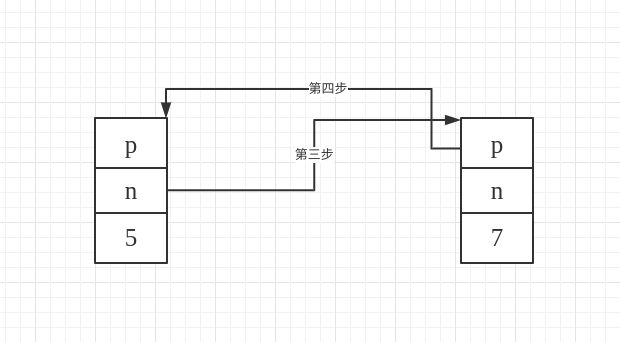
例えば、ノード値9のノードを削除する場合の、ステップ3とステップ4の図解です:
(2)一連の要素の削除の詳細分析
iterator
#if __cplusplus >= 201103L
erase(const_iterator __first, const_iterator __last) noexcept
#else
erase(iterator __first, iterator __last)
#endif
{
    while (__first != __last)
        __first = erase(__first);
    return __last._M_const_cast();
}
eraseを使い、与えられたイテレータの範囲内のデータを削除します。
(3)すべての要素の削除の詳細分析
要素を空にし、初期化して、listのデフォルトの状態に戻します。
_M_clearの実装は:libstdc++-v3/include/bits/list.tccの中にあります:
_List_base<_Tp, _Alloc>::
_M_clear() _GLIBCXX_NOEXCEPT
{
  typedef _List_node<_Tp>  _Node;
  _Node* __cur = static_cast<_Node*>(_M_impl._M_node._M_next);
  while (__cur != &_M_impl._M_node)
    {
      _Node* __tmp = __cur;         // 保存节点
      __cur = static_cast<_Node*>(__cur->_M_next);  // 往后遍历
    #if __cplusplus >= 201103L
      _M_get_Node_allocator().destroy(__tmp);
    #else
      _M_get_Tp_allocator().destroy(std::__addressof(__tmp->_M_data));
    #endif
      _M_put_node(__tmp);   // 释放内存
    }
}
_M_initの実装は、すべて自分自身を指せばよいだけです。
void _M_init()
_GLIBCXX_NOEXCEPT
{
    this->_M_impl._M_node._M_next = &this->_M_impl._M_node;
    this->_M_impl._M_node._M_prev = &this->_M_impl._M_node;
}
【要素アクセス】
それぞれ2つのバージョンが実装されています:参照とconst参照です。
- front 最初の要素を返します
reference front()
_GLIBCXX_NOEXCEPT
{ return *begin(); }
const_reference
front() const
_GLIBCXX_NOEXCEPT
{ return *begin(); }
- 最後の要素を返します
reference
back()
_GLIBCXX_NOEXCEPT
{
    iterator __tmp = end();
    --__tmp;
    return *__tmp;
}
const_reference
back() const
_GLIBCXX_NOEXCEPT
{
    const_iterator __tmp = end();
    --__tmp;
    return *__tmp;
}
【アルゴリズム】
- unique
コンテナ内の連続する等しい要素の各グループから、最初の要素を除くすべての要素を削除します。
リストコンテナと隣接する要素との比較においてのみ、その要素がリストコンテナから削除されることに注意してください。したがって、この機能はソートされたリストに対して特に有用です。
template<typename _Tp, typename _Alloc>
template <typename _BinaryPredicate>
  void
  list<_Tp, _Alloc>::
  unique(_BinaryPredicate __binary_pred)
  {
    iterator __first = begin();
    iterator __last = end();
    if (__first == __last)
  return;
    iterator __next = __first;
    while (++__next != __last)
  {
    // 满足条件就删除
    if (__binary_pred(*__first, *__next))
       // 删除
      _M_erase(__next);
    else
      __first = __next;
    __next = __first;
  }
  }
例を以下に示します:
// list::unique
#include <iostream>
#include <cmath>
#include <list>

// a binary predicate implemented as a function:
bool same_integral_part (double first, double second)
{ return ( int(first)==int(second) ); }

// a binary predicate implemented as a class:
struct is_near {
  bool operator() (double first, double second)
  { return (fabs(first-second)<5.0); }
};

int main ()
{
  double mydoubles[]={ 12.15,  2.72, 73.0,  12.77,  3.14,
                       12.77, 73.35, 72.25, 15.3,  72.25 };
  std::list<double> mylist (mydoubles,mydoubles+10);

  mylist.sort();             //  2.72,  3.14, 12.15, 12.77, 12.77,
                             // 15.3,  72.25, 72.25, 73.0,  73.35

  mylist.unique();           //  2.72,  3.14, 12.15, 12.77
                             // 15.3,  72.25, 73.0,  73.35

  mylist.unique (same_integral_part);  //  2.72,  3.14, 12.15
                                       // 15.3,  72.25, 73.0

  mylist.unique (is_near());           //  2.72, 12.15, 72.25

  std::cout << "mylist contains:";
  for (std::list<double>::iterator it=mylist.begin(); it!=mylist.end(); ++it)
    std::cout << ' ' << *it;
  std::cout << '\n';

  return 0;
}
上の場合、ソート後はすべての重複要素が削除されて1つだけ残りますが、ソートしなければ重複していて連続している要素のみが削除されます。
- merge
mergeのソースコード実装は前の_M_transfer関数を採用しています。現在list1とlist2の2つのlistがあるとします。list1の中の要素とlist2の中の要素を比較し、list1の要素値がlist2の要素値より小さければ、list1のイテレータを++し、いかなる操作も行いません。一方、list1の要素値がlist2の要素値より大きければ、そのたびにlist2の小さい要素に対応するイテレータを_M_transfer関数に渡します。この関数を通して、list1の中の先ほど比較したイテレータの前に、list2のより小さい要素を挿入します。こうして最終的にすべての要素がlist1に挿入されます。
list1の走査がすでに終わったのに、list2がまだ走査し終えていない場合は、_M_transferを1回実行するだけで、list2の連結リストを現在のイテレータから最後のendまでlist1の末尾に挿入すればよいのです。
template<typename _Tp, typename _Alloc>
void
list<_Tp, _Alloc>::
#if __cplusplus >= 201103L
merge(list&& __x)
#else
merge(list& __x)
#endif
{
  // _GLIBCXX_RESOLVE_LIB_DEFECTS
  // 300. list::merge() specification incomplete
  if (this != &__x)
  {
      _M_check_equal_allocators(__x);

      iterator __first1 = begin();
      iterator __last1 = end();
      iterator __first2 = __x.begin();
      iterator __last2 = __x.end();
      while (__first1 != __last1 && __first2 != __last2)
        if (*__first2 < *__first1)
         {
            iterator __next = __first2;
            _M_transfer(__first1, __first2, ++__next);
            __first2 = __next;
         }
        else
          ++__first1;
      if (__first2 != __last2)
        _M_transfer(__last1, __first2, __last2);
   }
}
使用:
int main() {
    list<int> l1 = {2,3,5,7};
    list<int> l2 = {1,10,9,5};
    l1.sort();
    l2.sort();
    l1.merge(l2);
    for(auto i:l1) cout<<i<<" ";    // 1 2 3 5 5 7 9 10
    return 0;
}
- sort
STL自体のソートアルゴリズムsortが受け取る入力イテレータはランダムアクセスイテレータですが、双方向連結リストコンテナであるlistのアクセス方式は双方向イテレータです。したがって、STL自体のソートアルゴリズムsortは使えず、自分自身のアクセスに属するソートアルゴリズムを自分で定義しなければなりません。ソースコードの剖析から、このソートアルゴリズムの思想はマージソートに似ていることがわかります。
sortの中のspliceが呼んでいるのは:
void splice(const_iterator __position, list& __x, const_iterator __i) noexcept
{ splice(__position, std::move(__x), __i); }
さらに分析します:
void
splice(iterator __position, list &__x, iterator __i)
{
    iterator __j = __i._M_const_cast();
    ++__j;
    if (__position == __i || __position == __j)
        return;

    if (this != &__x)
        _M_check_equal_allocators(__x);

    this->(__position._M_const_cast(),
                      __i._M_const_cast(), __j);
}
最後に呼ばれるのは_M_transferです。
sortの中にはもう1つ関数swapがあり、2つの連結リストの交換を完了させます。実装コードはgcc-4.9.1/libstdc++-v3/src/c++98/list.ccの中にあります:
void
_List_node_base::swap(_List_node_base& __x,
          _List_node_base& __y) _GLIBCXX_USE_NOEXCEPT
{
      if ( __x._M_next != &__x )
    {
      if ( __y._M_next != &__y )
        {
          // Both __x and __y are not empty.
          std::swap(__x._M_next,__y._M_next);
          std::swap(__x._M_prev,__y._M_prev);
          __x._M_next->_M_prev = __x._M_prev->_M_next = &__x;
          __y._M_next->_M_prev = __y._M_prev->_M_next = &__y;
        }
      else
        {
              // __x is not empty, __y is empty.
              __y._M_next = __x._M_next;
              __y._M_prev = __x._M_prev;
              __y._M_next->_M_prev = __y._M_prev->_M_next = &__y;
              __x._M_next = __x._M_prev = &__x;
            }
        }
      else if ( __y._M_next != &__y )
        {
          // __x is empty, __y is not empty.
          __x._M_next = __y._M_next;
          __x._M_prev = __y._M_prev;
          __x._M_next->_M_prev = __x._M_prev->_M_next = &__x;
          __y._M_next = __y._M_prev = &__y;
        }
}
具体的な実装の考え方は、2つの連結リストが空か空でないかを判断し、その後nextポインタとprevポインタを修正するというものです。
続いて、強力なsortを見てみましょう:
template<typename _Tp, typename _Alloc>
void
list<_Tp, _Alloc>::
sort() {
    // Do nothing if the list has length 0 or 1.
    if (this->_M_impl._M_node._M_next != &this->_M_impl._M_node
        && this->_M_impl._M_node._M_next->_M_next != &this->_M_impl._M_node) {
        list __carry; // 辅助链表,用于从a中提取元素以及临时保存两个链表的合并结果
        list __tmp[64]; // 保存着当前每一个归并层次的结果, i号链表保存的元素个数为2的i次方或者0
        list *__fill = &__tmp[0]; // 表示当前最大归并排序的层次,while循环之后__fill变成log2(list.size())
        list *__counter;

        do {
            __carry.splice(__carry.begin(), *this, begin()); //把当前链表的第一个节点放在carry链表头

            for (__counter = &__tmp[0];
                 __counter != __fill && !__counter->empty();
                 ++__counter) {
                __counter->merge(__carry);  // 两个有序链表合并
                __carry.swap(*__counter); // 类似于交换链表carry和counter[i]内容
            }
            __carry.swap(*__counter); // 类似于交换链表carry和counter[i]内容
            if (__counter == __fill)
                ++__fill;
        } while (!empty());
        // 每两个进行归并,依次网上,直到最后*(__fill-1)保存最后的排序结果。然后交换到当前list中。
        for (__counter = &__tmp[1]; __counter != __fill; ++__counter)
            __counter->merge(*(__counter - 1));
        swap(*(__fill - 1));
    }
}
上のコードはかなり分かりにくく見えます。ネットで調べたところ、G2.9では:
template <class T, class Alloc>
void list<T, Alloc> :: sort(){
    // 判断链表是否为空或者只有一个元素
    if(node->next == node || link_type(node->next)->next == node){
        return;
    }

    list<T, Alloc> carry;
    list<T, alloc> counter[64];
    int fill = 0;
    while(!empty()){
        carry.splice(carry.begin(), *this, begin());
        int i = 0;
        while(i < fill && !counter[i].empty()){
            counter[i].merge(carry);
            carry.swap(counter[i++]);
        }
        carry.swap(counter[i]);
        if(i == fill){
            ++fill;
        }
    }

    for(int i = 1; i < fill; ++i){
        counter[i].merge(counter[i-1]);
    }
    swap(counter[fill-1]);
}
対応する外部実装は:
void sortList(list<int> &l) {
    if (l.size() <= 1) {
        return;
    }
    list<int> carry;       // 辅助链表,用于从a中提取元素以及临时保存两个链表的合并结果
    list<int> counter[64]; // 保存着当前每一个归并层次的结果, i号链表保存的元素个数为2的i次方或者0
    int fill = 0;          // 表示当前最大归并排序的层次,while循环之后fill变成log2(a.size())

    while (!l.empty()) {
        carry.splice(carry.begin(), l, l.begin()); // 将链表a中的第一个元素移动至carry开头
        int i = 0;
        // 从小往大不断合并非空归并层次直至遇到空层或者到达当前最大归并层次
        while (i < fill && !counter[i].empty()) {
            counter[i].merge(carry);    // 链表合并,结果链表是有序的,必须保证合并前两个链表是有序的
            carry.swap(counter[i++]);   // 链表元素互换
        }
        carry.swap(counter[i]);
        if (i == fill) {       // i到达当前最大归并层次,说明得增加一层
            ++fill;
        }
    }

    for (int i = 1; i < fill; ++i) {  // 将所有归并层次的结果合并得到最终结果counter[fill - 1]
        counter[i].merge(counter[i - 1]);
    }
    l.swap(counter[fill - 1]);
}
この部分は次を参照できます
上のリンクに詳細な過程の図解があります。
もう一度G4.9を対応する外部実装に変換すると:
void sortList1(list<int> &l) {
    typedef list<int> list;
    if (l.size() <= 1) {
        return;
    }
    list __carry;
    list __tmp[64];
    list *__fill = &__tmp[0];
    list *__counter;
    do {
        __carry.splice(__carry.begin(), l, l.begin());
        for (__counter = &__tmp[0];
             __counter != __fill && !__counter->empty();
             ++__counter) {
            __counter->merge(__carry);
            __carry.swap(*__counter);
        }
        __carry.swap(*__counter);
        if (__counter == __fill) ++__fill;
    } while (!l.empty());

    for (__counter = &__tmp[1]; __counter != __fill; ++__counter)
        __counter->merge(*(__counter - 1));

    l.swap(*(__fill - 1));
}
使用:
int main() {
    list<int> l = {7, 5, 8, 1};
    cout << "===============排序前==============" << endl;
    for (auto i:l) cout << i << " ";
    cout << endl;
    sortList1(l);
    cout << "===============排序后==============" << endl;
    for (auto i:l) cout << i << " ";
    cout << endl;

    return 0;
}
【演算子のオーバーロード】
template<typename _Tp, typename _Alloc>
inline bool
operator==(const list<_Tp, _Alloc> &__x, const list<_Tp, _Alloc> &__y) {
    typedef typename list<_Tp, _Alloc>::const_iterator const_iterator;
    const_iterator __end1 = __x.end();
    const_iterator __end2 = __y.end();

    const_iterator __i1 = __x.begin();
    const_iterator __i2 = __y.begin();
    while (__i1 != __end1 && __i2 != __end2 && *__i1 == *__i2) {
        ++__i1;
        ++__i2;
    }
    return __i1 == __end1 && __i2 == __end2;
}
実装の考え方は、繰り返し判断して2つのイテレータが両方とも末尾に到達したかどうかを確認するというものです。
残りは他の演算子のオーバーロードで、比較的単純なので述べません。その中のlexicographical_compareの実装はc++-v3/src/c++98/stl_algobase.hにあります。この関数は、辞書式順序で[frist1,last1)が[first2,last2)より小さいかどうかをテストします。この関数はopeartor<またはcompを使って比較を行います。その振る舞いは次に似ています:2つのシーケンスの長さが異なり、短いシーケンスと長いシーケンスの先頭が完全に同じ場合、例えばexampleとexampleeの場合、長い方の辞書式順序は短い方より大きくなります。
template <class InputIterator1, class InputIterator2>
bool lexicographical_compare (InputIterator1 first1, InputIterator1 last1,
InputIterator2 first2, InputIterator2 last2)
{
    while (first1!=last1)
    {
        if (first2==last2 || *first2<*first1) return false;
        else if (*first1<*first2) return true;
        ++first1; ++first2;
    }
    return (first2!=last2);
}
使用:
int main() {
     vector<char> v1{'h','e','l','l','o'};
    vector<char> v2{'h','e','l','l','o','o'};
    vector<char> v3{'h','e','l','m','o'};
    cout<<"v1=";
    for(char i:v1)
        cout<<i<<" ";
    cout<<endl;
    cout<<"v2=";
    for(char i:v2)
        cout<<i<<" ";
    cout<<endl;
    cout<<"v3=";
    for(char i:v3)
        cout<<i<<" ";
    cout<<endl;

    if(lexicographical_compare(v1.begin(),v1.end(),v2.begin(),v2.end()))
        cout<<"v1 is less than v2 "<<endl;
    else
        cout<<"v2 is less than v1 "<<endl;

    if(lexicographical_compare(v1.begin(),v1.end(),v3.begin(),v3.end()))
        cout<<"v1 is less than v3 "<<endl;
    else
        cout<<"v3 is less than v1 "<<endl;
}
その他のオーバーロード演算子は次の通りです:
template<typename _Tp, typename _Alloc>
inline bool
operator<(const list<_Tp, _Alloc> &__x, const list<_Tp, _Alloc> &__y) {
    return std::lexicographical_compare(__x.begin(), __x.end(),
                                        __y.begin(), __y.end());
}

/// Based on operator==
template<typename _Tp, typename _Alloc>
inline bool
operator!=(const list<_Tp, _Alloc> &__x, const list<_Tp, _Alloc> &__y) { return !(__x == __y); }

/// Based on operator<
template<typename _Tp, typename _Alloc>
inline bool
operator>(const list<_Tp, _Alloc> &__x, const list<_Tp, _Alloc> &__y) { return __y < __x; }

/// Based on operator<
template<typename _Tp, typename _Alloc>
inline bool
operator<=(const list<_Tp, _Alloc> &__x, const list<_Tp, _Alloc> &__y) { return !(__y < __x); }

/// Based on operator<
template<typename _Tp, typename _Alloc>
inline bool
operator>=(const list<_Tp, _Alloc> &__x, const list<_Tp, _Alloc> &__y) { return !(__x < __y); }
1.2 list基底クラスのソースコード
_list_baseの中には構造体_List_implがあり、_List_implの中にはList_node_baseがあります。
class _List_base
{
protected:
  typedef typename _Alloc::template rebind<_List_node<_Tp> >::other
    _Node_alloc_type;

  typedef typename _Alloc::template rebind<_Tp>::other _Tp_alloc_type;

  struct _List_impl
  : public _Node_alloc_type
  {
    __detail::_List_node_base _M_node;

    _List_impl()
    : _Node_alloc_type(), _M_node()
    { }

    _List_impl(const _Node_alloc_type& __a) _GLIBCXX_NOEXCEPT
    : _Node_alloc_type(__a), _M_node()
    { }

    #if __cplusplus >= 201103L
    _List_impl(_Node_alloc_type&& __a) _GLIBCXX_NOEXCEPT
    : _Node_alloc_type(std::move(__a)), _M_node()
    { }
    #endif
  };

  _List_impl _M_impl;
};
最終的に形成される図は次の通りです:
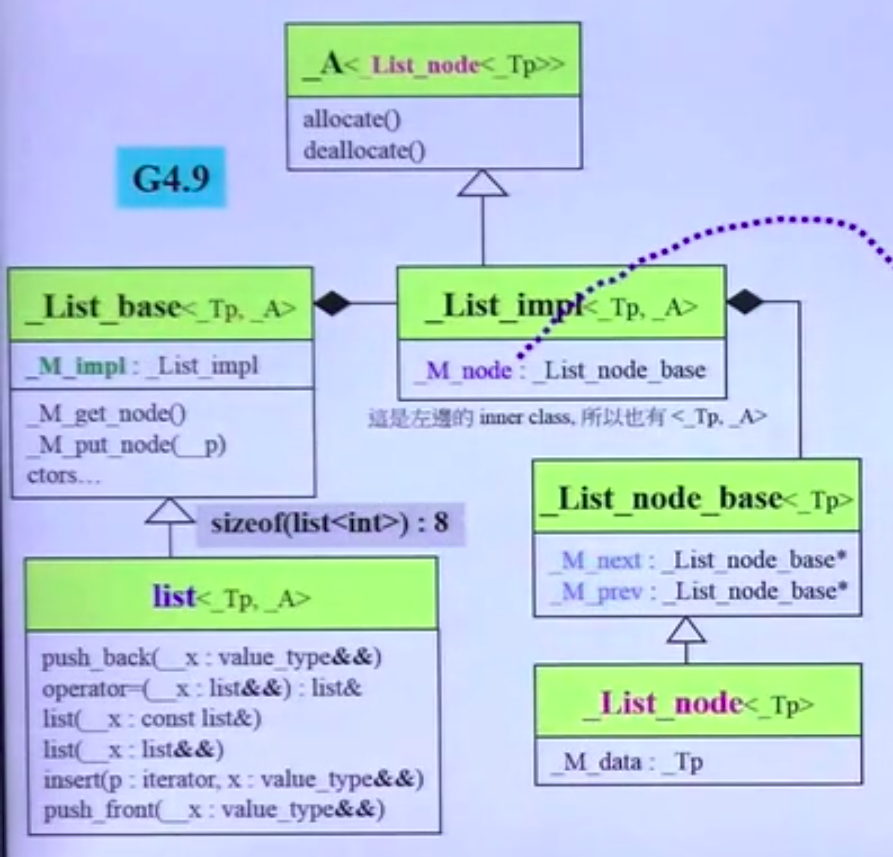
したがって、次を求めると:
理由は次の通りです:
listのsizeofは1なので、sizeofは基底クラス_list_base由来です。そして_list_baseの中には構造体_List_implがあり、_List_implの中には_List_node_baseがあります。
_List_node_baseの中には2つのポインタがあり、64ビットではそれぞれ8バイトで、合計16バイトです。
2.listのIteratorの剖析
2.1 iterator
listのiteratorの定義
template<typename _Tp>
struct _List_iterator
{
  typedef _List_iterator<_Tp>                _Self;
  typedef _List_node<_Tp>                    _Node;

  typedef ptrdiff_t                          difference_type;
  typedef std::bidirectional_iterator_tag    iterator_category;
  typedef _Tp                                value_type;
  typedef _Tp*                               pointer;
  typedef _Tp&                               reference;

   // The only member points to the %list element.
   __detail::_List_node_base* _M_node;
   //  _List_node(节点的数据部分) -> _List_node_base(前指针与后指针)

  _List_iterator() _GLIBCXX_NOEXCEPT
  : _M_node() { }

  explicit
  _List_iterator(__detail::_List_node_base* __x) _GLIBCXX_NOEXCEPT
  : _M_node(__x) { }

  _Self
  _M_const_cast() const _GLIBCXX_NOEXCEPT
  { return *this; }

  // The only member points to the %list element.
  __detail::_List_node_base* _M_node;
};
内部のオーバーロード関数:
// Must downcast from _List_node_base to _List_node to get to _M_data.
// 重载*操作符
reference operator*() const _GLIBCXX_NOEXCEPT
{
    return static_cast<_Node*>(_M_node)->_M_data;
}

// 重载->操作符
pointer operator->() const _GLIBCXX_NOEXCEPT
{
    return std::__addressof(static_cast<_Node*>(_M_node)->_M_data);
}

// 重载前置++操作符  ++i
_Self& operator++() _GLIBCXX_NOEXCEPT
{
    _M_node = _M_node->_M_next;
    return *this;
}

// 重载后置++操作符 i++
_Self operator++(int) _GLIBCXX_NOEXCEPT
{
    _Self __tmp = *this;             // 记录原值  *调用的是拷贝构造函数
    _M_node = _M_node->_M_next;      // 进行操作
    return __tmp;                    // 返回原值
}

// 重载前置--操作符  --i
_Self& operator--() _GLIBCXX_NOEXCEPT
{
    _M_node = _M_node->_M_prev;
    return *this;
}
// 重载后置--操作符  --i
_Self operator--(int) _GLIBCXX_NOEXCEPT
{
    _Self __tmp = *this;
    _M_node = _M_node->_M_prev;
    return __tmp;
}
// 重载++操作符
bool operator==(const _Self& __x) const _GLIBCXX_NOEXCEPT
{
    return _M_node == __x._M_node;
}
// 重载!=操作符
bool operator!=(const _Self& __x) const _GLIBCXX_NOEXCEPT
{
    return _M_node != __x._M_node;
}
2.2 ノード設計
iterator内部の_List_node。ここから、_List_node_baseを継承していることがわかります。
_List_nodeがデータ部分を置きます
_List_node_baseが前後のポインタを置きます
/// An actual node in the %list.
template<typename _Tp>
struct _List_node : public __detail::_List_node_base
{
  ///< User's data.
  _Tp _M_data;

#if __cplusplus >= 201103L
  template<typename... _Args>
    _List_node(_Args&&... __args)
: __detail::_List_node_base(), _M_data(std::forward<_Args>(__args)...)
    { }
#endif
};
_List_node_baseのコード:
namespace __detail
{
    _GLIBCXX_BEGIN_NAMESPACE_VERSION
    /// Common part of a node in the %list.
    struct _List_node_base
    {
      _List_node_base* _M_next;
      _List_node_base* _M_prev;

      static void
      swap(_List_node_base& __x, _List_node_base& __y) _GLIBCXX_USE_NOEXCEPT;

      void
      _M_transfer(_List_node_base* const __first,
          _List_node_base* const __last) _GLIBCXX_USE_NOEXCEPT;

      void
      _M_reverse() _GLIBCXX_USE_NOEXCEPT;

      void
      _M_hook(_List_node_base* const __position) _GLIBCXX_USE_NOEXCEPT;

      void
      _M_unhook() _GLIBCXX_USE_NOEXCEPT;
    };

    _GLIBCXX_END_NAMESPACE_VERSION
} // namespace detail
イテレータは設計の時、常に「前閉後開」(半開区間)の原則を保っています。例えばiter->begin()は最初の要素を指し、iter->end()は実際の最後の要素の次の要素を指します。そのため最後の設計では、循環listの末尾に空白ノードをわざと加え、STLの前閉後開の原則に合わせています。
関連トピック
- STL array ソースコード解析 | C++那些事
- STL string 深入解析 | C++那些事
- STL string 面接問題解説 | C++那些事
- STL deque ソースコード解析 | C++那些事
- STL 空基底クラス最適化 EBO | C++那些事
- STL 手書きハッシュテーブル実装 | C++那些事
- STL hashtable ハッシュテーブル | C++那些事
- STL イテレータソースコード解析 | C++那些事
- STL map と multimap | C++那些事
- STL queue と stack ソースコード解析 | C++那些事